The best 3D printer upgrades, ranked by what actually moved the needle on my bench, are auto bed leveling, a stiffer direct-drive extruder, an all-metal hotend, firmware-level input shaping, and an enclosure for engineering filaments. Across the machines I’ve run, those five fixed more failed prints than every other mod combined.
I’ve spent years buying, running, and tearing down the printers that matter — a kit-built Prusa MK4S as my reliability benchmark, plus a Bambu A1 and P1S, a Creality K1C, and an Anycubic Kobra 3 on the bench beside it. Most of them shipped with the upgrades below already baked in, which is exactly how I learned which ones earn their keep. This guide is the order I’d add them to an older or budget machine, the money I’d skip, and what each one realistically buys you.
How I Rank a 3D Printer Upgrade
Every upgrade gets scored on three axes on my bench: print-quality impact, cost, and install difficulty. The mods worth doing first sit in the high-impact, low-cost corner — a $12 PEI sheet or a $4 set of silicone bed spacers fixes more first-layer failures than a $200 toolhead swap. I rank by failed-print reduction, not by how impressive the part looks in a photo.
The trap most upgrade lists fall into is treating every mod as equal. It isn’t. A printer that already lays a clean first layer and holds dimensional accuracy doesn’t need a linear-rail conversion — it needs better filament handling. Before you spend a cent, run the failures down with the common failure diagnostic and figure out what’s actually breaking. Half the “I need an upgrade” posts I read are really a wet-filament or bed-adhesion problem in disguise.
Auto Bed Leveling: The Probe Upgrade
Auto bed leveling (ABL) is the single highest-return upgrade for any printer still running manual paper-and-thumbscrew leveling. A probe maps the bed’s actual shape — typically a 5×5 or 7×7 grid — and the firmware compensates in real time so the nozzle holds a consistent gap across a warped or tilted plate. On my bench it cut first-layer failures on older machines to near zero.
The two probes everyone argues about are the BLTouch and the clone-killing CR Touch. Both are deploy-pin probes that touch the bed mechanically; the practical differences are in the pin material and reliability over thousands of cycles. I break the full comparison down in BLTouch vs CR Touch, but the headline is that ABL of some kind — pin probe, inductive, or the strain-gauge eddy-current sensors the newest machines use — belongs on every printer. My MK4S uses a loadcell nozzle probe; my Bambu machines use the Eddy-style sensor. None of them have a leveling thumbscrew anymore, and I don’t miss them.
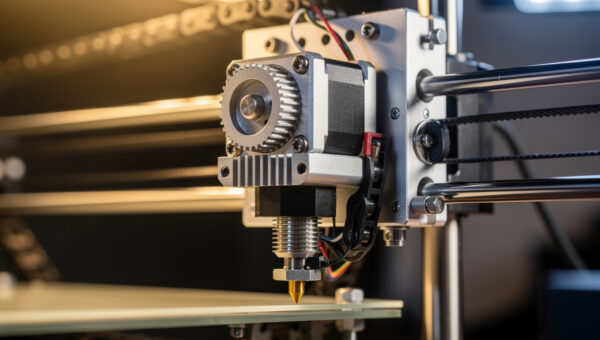
Direct Drive vs Bowden: The Extruder Decision
Moving the extruder motor onto the toolhead — a direct-drive conversion — is the upgrade that finally makes flexible filament printable and tightens retraction on everything else. A direct setup has roughly 30–45mm of filament path between gear and nozzle versus 400–700mm of Bowden tube, so retraction distances drop from 5–7mm to under 1mm and stringing collapses.
The trade is moving mass: a heavier toolhead is harder to accelerate cleanly, which is exactly where input shaping earns its place. If you print TPU, do parts with lots of retractions, or fight chronic stringing, direct drive is worth the weight. If you only run PLA and PETG on a CoreXY at speed, a well-tuned Bowden is still fine. I lay out the full trade-off in direct drive vs Bowden. My TPU work — covered in the TPU settings profile — only became reliable once I stopped trying to push 95A flex through a Bowden tube.
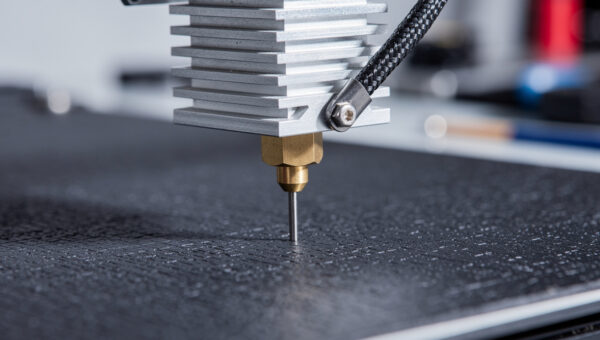
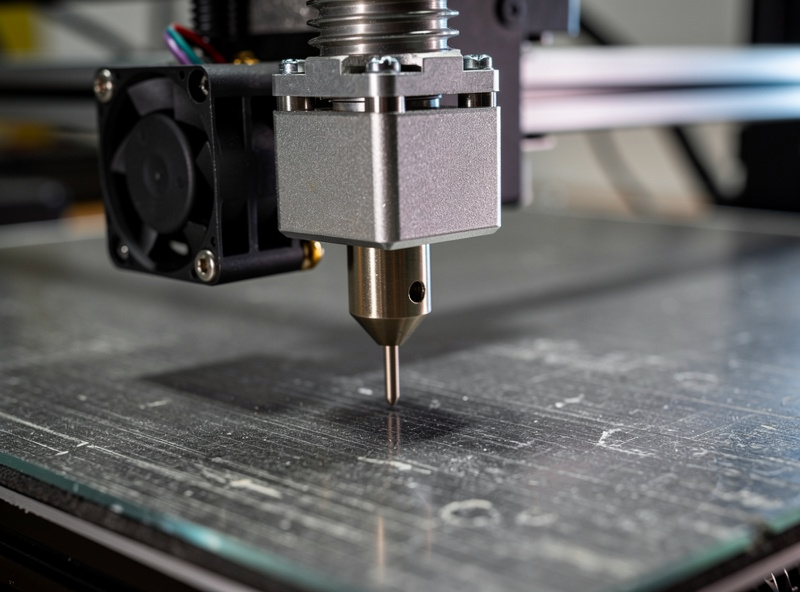
The Hotend: Where Speed and Materials Live
A hotend upgrade is what unlocks higher flow, abrasion resistance, and high-temperature materials. The three things that matter are the heatbreak (bimetal beats all-PTFE-lined for anything above PLA), the nozzle (hardened steel or a ruby/tungsten tip for carbon-fiber and glow filaments), and the heater wattage, which sets your maximum volumetric flow. An all-metal heatbreak matters because PTFE-lined paths begin to degrade around 280°C; E3D rates its all-metal V6 hotend to 300°C (up to 500°C with a copper block and PT1000 sensor).
A stock 0.4mm brass nozzle wears visibly within a couple hundred grams of PA-CF — I’ve measured the bore opening up and the prints going fuzzy. Swapping to a hardened nozzle before you touch abrasives is non-negotiable, a point I hammer in the carbon fiber filament guide. For the full breakdown of heatbreaks, flow rates, and which nozzle for which material, see the best 3D printer hotend guide. A high-flow hotend is also the only “speed” upgrade that’s real — your printer’s headline mm/s number is meaningless if the hotend can’t melt plastic fast enough to feed it.
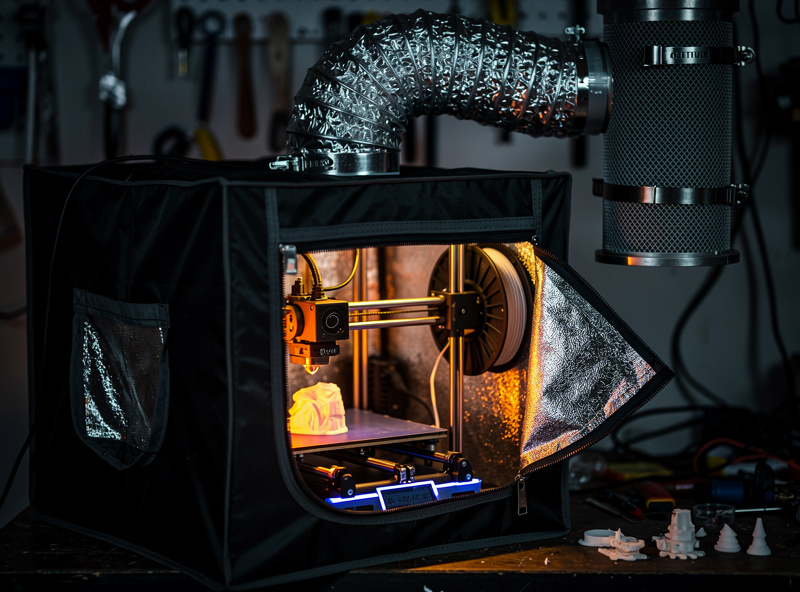
An Enclosure: The Cheapest Path to Engineering Filaments
An enclosure traps the printer’s own waste heat to hold the chamber at 40–55°C, which is what ABS, ASA, and PC-blends need to stop warping and delaminating. It’s also the single biggest improvement to layer adhesion on those materials — and it cuts the fine ultrafine-particle emissions you don’t want to breathe.
You do not need to buy a branded box. My shop enclosure started as a grow tent with a carbon-filter exhaust duct, and it holds chamber temperature better than several injection-molded units I’ve tested. The full build — frame options, ventilation, fire safety, and why you ventilate ABS — is in the DIY enclosure guide, and the broader shop layout lives in the workspace setup guide. If you only ever print PLA, skip the enclosure — PLA actually prefers the cooler open air and an enclosure can heat-creep its way into clogs.
Firmware: Klipper vs Marlin
A firmware change is a free upgrade that can double usable print speed without touching hardware. Marlin runs on the printer’s own 8- or 32-bit board; Klipper offloads the math to a Raspberry Pi or equivalent and drives the mainboard as a dumb motor controller, which unlocks pressure advance, resonance compensation, and a far better motion planner.
The catch is setup effort and the risk of bricking a print mid-job if your host pi browns out. For a tinkerer who wants the absolute most out of an older Ender or a Voron, Klipper is transformative; for someone who wants to print and walk away, modern Marlin is genuinely good now. I run both — Klipper on my CoreXY builds, the stock firmware on the appliances. The full decision tree is in Klipper vs Marlin.
Input Shaping: The Upgrade That Makes Speed Real
Input shaping is the firmware feature that cancels the ringing and ghosting that show up when you print fast. Klipper documents the available shaper types and the accelerometer-based tuning process in its Resonance Compensation reference. An accelerometer measures the printer’s resonant frequency, and the motion system pre-shapes each move to avoid exciting that frequency — so you can run 8,000–20,000 mm/s² of acceleration and still get sharp corners.
This is the upgrade that turned “fast printing” from a gimmick into something I actually use daily. Without it, cranking acceleration just smears every corner into a ghost. With it, my P1S and MK4S hold crisp detail at speeds that would have been a blurry mess five years ago. The measurement process, the ADXL345 wiring, and reading the resonance graph are all in input shaping for 3D printing. It pairs with direct drive: the heavier toolhead needs the shaping more, and the shaping makes the heavier toolhead acceptable.
The Cheap Upgrades That Punch Above Their Weight
Before any toolhead surgery, these sub-$30 mods fix the most prints per dollar on my bench. A textured or smooth PEI spring-steel sheet ends glue sticks and painter’s tape forever — flex the plate, the part pops off, and adhesion becomes a non-issue. Silicone bed spacers replace mushy leveling springs so your mesh doesn’t drift between prints. A hardened nozzle ($10) saves a $0.40 brass nozzle from destroying a $60 spool of CF.
Add genuine Capricorn PTFE for tighter Bowden tolerance, TMC2209 stepper drivers for silent, more accurate motion on older boards, a real part-cooling fan duct (the most underrated overhang fix), dual-Z synchronization with a belt or a second leadscrew to kill Z-banding on tall prints, and a filament runout sensor so a mid-print spool change doesn’t cost you an eight-hour job. None of these are glamorous. All of them earn their place. Good filament handling — covered in the filament drying guide — beats most of them combined, which is why dry storage is the first “upgrade” I tell anyone to buy.
3D Printer Upgrade Comparison
Here is how the major upgrades rank against each other on impact, cost, and difficulty, based on the install and test logs from across my machines. Impact is measured as failed-print reduction and quality gain, not bragging rights.
| Upgrade | Print-Quality Impact | Typical Cost | Install Difficulty | Best For |
|---|---|---|---|---|
| PEI spring steel sheet | High (adhesion) | $12–35 | None (drop-in) | Every printer |
| Auto bed leveling probe | High (first layer) | $15–45 | Medium (wiring + firmware) | Manual-level machines |
| Direct-drive extruder | High (flex + stringing) | $40–120 | Medium-Hard | TPU, retraction-heavy parts |
| All-metal / hardened hotend | High (materials + speed) | $25–90 | Medium | ABS, CF, high-temp, fast printing |
| DIY enclosure | High (warp, adhesion) | $30–150 | Easy-Medium | ABS, ASA, PC-blends |
| Klipper firmware | Medium-High (speed) | $0–60 (host pi) | Hard (config) | Tinkerers, older fast machines |
| Input shaping accelerometer | Medium-High (speed quality) | $10–30 | Medium | Anyone printing fast |
| Silicone bed spacers | Medium (mesh stability) | $4–8 | None | Spring-leveled beds |
| TMC2209 drivers | Low-Medium (noise, accuracy) | $15–35 | Medium | Older noisy boards |
| Linear rails | Low (most machines) | $60–200 | Hard | Worn V-wheel frames only |
Build Plates and Bed Surfaces
The build surface is the cheapest upgrade with the highest hit rate, because nearly every “my print won’t stick” or “my print warped off the bed” problem lives here. A flexible spring-steel sheet with a PEI coating ends the era of glue sticks, hairspray, and painter’s tape: you print, let it cool, flex the plate, and the part releases on its own. On my bench, swapping a fixed glass or buildtak bed for a removable PEI sheet cut adhesion failures more than any motion upgrade I’ve made.
There are three surfaces worth knowing. Smooth PEI gives a glassy bottom finish and grips PETG almost too well — I run a thin glue layer as a release agent so PETG doesn’t tear a divot out of the sheet. Textured powder-coated PEI is my daily default: it hides first-layer imperfections, releases reliably as the part cools, and survives abuse. Satin or smooth garolite (FR4) is the specialist surface for nylon and PA-CF, which refuse to bond to PEI. Keep a separate sheet for high-temp engineering filament and a separate one for everyday PLA and PETG, because contamination from fingerprints and release agents is the real adhesion killer — a wipe with isopropyl alcohol between prints does more than any bed upgrade.
Motion System and Frame Upgrades
Motion upgrades matter only when the frame is actually the limiting factor, which is less often than the forums suggest. The genuinely worthwhile ones are belt tensioners and quality belts, dual-Z synchronization, and on bed-slinger designs, anything that reduces the mass being flung back and forth. Loose or stretched belts show up as dimensional inaccuracy and layer shifts; a $6 set of GT2 belts and a printed tensioner fixes that for almost nothing and is the first motion mod I’d do.
Dual-Z is the upgrade I recommend most on single-leadscrew machines. A second leadscrew, or better, a belt linking both Z motors, stops the unsupported side of the gantry from sagging and kills the Z-banding that shows up as horizontal ripples on tall prints. I added synchronized Z to an older bedslinger and the improvement on 200mm-tall parts was obvious in the first print. Linear rails, by contrast, sit at the bottom of my priority list — they look like a serious upgrade but on a frame whose wheels are properly tensioned they change almost nothing you can measure, and a sloppy rail install is worse than tight wheels. Spend the rail money on a hardened hotend and dry filament instead.
Quality-of-Life and Monitoring Upgrades
The upgrades that don’t change a single printed dimension but change how often you babysit the machine are the ones I value most after years of running a print bench. A filament runout sensor pauses the print instead of letting it air-print the last three hours of an overnight job — it has saved me more wasted filament than I can count. An LED light bar over the bed isn’t vanity; it’s how you actually see a first-layer problem in time to cancel.
A print camera — even a cheap one feeding a phone — lets you kill a failing print remotely instead of coming home to a bird’s nest welded to the nozzle. On Klipper machines, a KlipperScreen touch display turns a headless Pi into a real control panel. And on older 8-bit boards, a 32-bit mainboard with TMC2209 drivers is the upgrade that makes everything else possible: quiet motion, sensorless homing, and the headroom to run the firmware features the rest of this guide depends on. None of these print a better part on their own, but together they turn a printer you have to watch into one you can trust to run unattended — which, for someone printing functional parts the way I do, is the whole point.
The Upgrades That Are Usually a Waste
Not every popular mod earns its money. Linear-rail conversions are the most over-recommended upgrade on the internet — on a healthy V-wheel or V-slot machine they buy you almost nothing measurable, and a worn frame is cheaper to re-tension than to re-engineer. I’ve A/B’d rails against properly adjusted wheels and couldn’t tell the parts apart.
“Upgraded” springs marketed as premium, glass beds for printers that already have PEI, and most aftermarket “high-speed” hotends that don’t actually raise volumetric flow are similar money pits. And the biggest waste of all is upgrading a printer to dodge a calibration problem — a $90 toolhead will not fix a part you could have saved by drying your filament or dialing in your infill and wall settings. When a machine is genuinely worn out, the honest move is often a new printer, not a slow-bleed of mods; my 2026 buyer’s guide covers when that math tips over.
A Sane Upgrade Order
If I were taking a tired budget printer up to modern standards, I’d buy in this order: dry-storage and a PEI sheet first, then ABL, then a hardened hotend, then an enclosure if you’re moving to ABS/ASA, then direct drive if you want flexibles, then Klipper plus input shaping to make the whole thing fast. That sequence front-loads the cheap, high-impact fixes and saves the fiddly toolhead and firmware work for last.
The deeper truth, after years of this, is that the operator is the bottleneck more often than the hardware. A dialed-in cheap printer beats a poorly-tuned expensive one every time — something I argue in how to choose your first 3D printer. Match the upgrade to the failure you actually have, lean on the right filament for the job, and most “I need to upgrade” problems turn out to be tuning problems you can fix for free. The full start-to-finish process is in the complete workflow guide.
A quick note: some links below are affiliate links — if you buy through them I may earn a small commission at no extra cost to you. I only point to gear I would actually run on my own bench. Details on my disclaimer page.
The upgrades I reach for most often: a textured PEI spring steel sheet, a hardened steel nozzle before any abrasive filament, an ADXL345 accelerometer for input shaping, a set of silicone bed spacers, and a filament dry box that quietly fixes more “upgrade” problems than any toolhead.
Frequently Asked Questions
What is the single best 3D printer upgrade?
Auto bed leveling, if you are still leveling by hand. A probe maps the bed and the firmware compensates so the first layer is consistent across a warped plate. It eliminates the most common failure on older machines for under 45 dollars.
Do new 3D printers still need upgrades?
Most current machines like the Prusa MK4S, Bambu P1S, and Creality K1C already ship with ABL, input shaping, and all-metal hotends built in. Upgrades mainly matter for older or budget printers, plus a PEI sheet and dry storage that help any machine.
Is a direct-drive upgrade worth it?
Yes if you print TPU or fight chronic stringing, because it cuts retraction distance from 5-7mm to under 1mm. If you only run PLA and PETG on a fast CoreXY, a well-tuned Bowden setup is still perfectly capable and lighter.
Will Klipper make my printer faster?
Yes. Klipper adds pressure advance, a better motion planner, and resonance compensation, often doubling usable speed on an older machine. The trade is a more involved setup and a host computer that must stay powered through the whole print.
Are linear rails worth installing?
Usually not. On a healthy V-wheel frame, linear rails produce almost no measurable quality gain. They only help a genuinely worn frame, and even then re-tensioning the existing wheels is far cheaper than a rail conversion.
What order should I install upgrades?
Dry storage and a PEI sheet first, then auto bed leveling, then a hardened hotend, then an enclosure for ABS or ASA, then direct drive for flexibles, and finally Klipper with input shaping to make everything fast and clean.