The practical difference between the BLTouch and the CR Touch is the sensing mechanism and the pin: the BLTouch uses a Hall-effect sensor with a retractable push-pin, while the CR Touch uses an optical sensor and an all-metal pin. Both physically tap the bed to map it, both are five-wire and firmware-compatible, and on my bench both deliver repeatable first layers — the CR Touch just costs less.
I’ve wired both of these onto Ender-class and other manual-leveling machines more times than I can count, because adding auto bed leveling is the upgrade I recommend first in the 3D printer upgrades guide. My current machines use loadcell and eddy-current probing instead, but the BLTouch-versus-CR-Touch question is still the one I get asked most, so here is the honest comparison from someone who has installed and lived with both.
How Each Probe Actually Works
Both probes are deploy-pin sensors: a pin drops down, the toolhead lowers until the pin touches the bed, the probe triggers, and the firmware records that Z height across a grid of points. The difference is how the trigger is detected. The BLTouch deploys a pin via a small solenoid and reads its position with a Hall-effect (magnetic) sensor. The CR Touch uses a photoelectric (optical) sensor to detect the pin’s movement instead.
That distinction sounds academic but it drives the real-world differences. The CR Touch’s metal pin and optical trigger are less sensitive to nearby magnetic fields and high heat, which is the failure mode that historically bit cheap BLTouch clones. Both map the bed into a mesh — typically a 5×5 grid for a 235mm bed — and the firmware tilts the entire coordinate system to match. The result on a warped or tilted plate is a first layer that stays consistent corner to corner, which is exactly the problem that kills prints on a manually leveled machine.
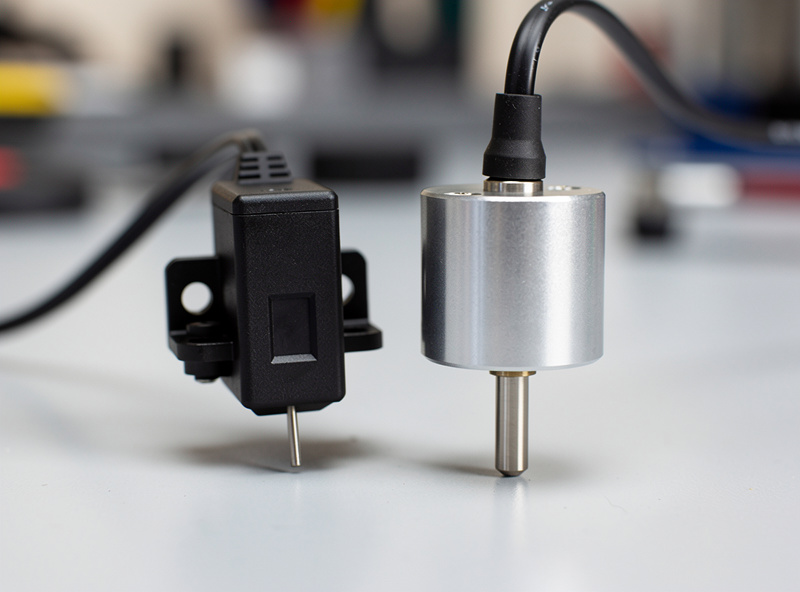
The Pin: Metal vs the BLTouch Push-Pin
The single most repeated complaint about early BLTouch units was pin reliability — the original push-pins could deform or, on melted-clone versions, soften near a hot nozzle. Antclabs moved to a more robust pin on the current Smart V3.1, but the CR Touch sidesteps the issue entirely with an all-metal pin from the start. In my test logs, the CR Touch pin shrugged off the occasional nozzle-blob crash that would knock a BLTouch out of calibration.
This is the CR Touch’s strongest practical argument. If your printer lives near a 250°C-plus hotend printing ABS or ASA all day, the metal pin and optical sensor are the more forgiving combination. For a PLA-and-PETG machine running cooler, the difference is much smaller and either pin will outlast the rest of the printer.
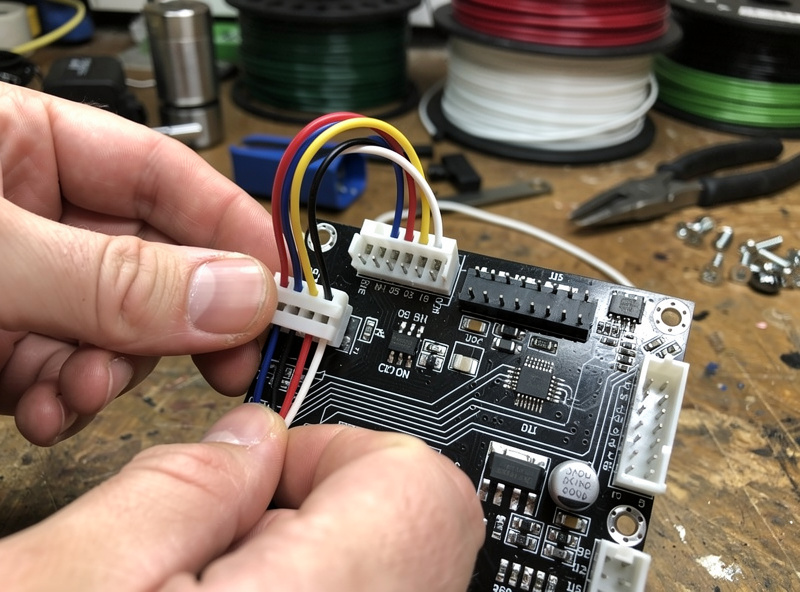
Wiring and Firmware Compatibility
The CR Touch was designed as a drop-in BLTouch alternative, so the wiring is effectively identical: a five-wire harness splitting into the three-wire servo control (deploy/retract signal) and the two-wire Z-probe trigger. On a Creality 32-bit board with the dedicated probe header, either one plugs straight in. On an older board you wire the control trio to the SERVO0 pins and the trigger pair to the Z-min endstop.
In firmware, both are configured as a BLTOUCH probe in Marlin — the CR Touch reports itself the same way, so you enable BLTOUCH, set your NOZZLE_TO_PROBE_OFFSET, turn on AUTO_BED_LEVELING_BILINEAR, and add a G29 to your start G-code. If you run Klipper instead, both are defined as a [bltouch] section. The point is that choosing one over the other does not change your firmware path — covered more broadly in my Klipper vs Marlin comparison. Whichever you pick, the probe offset measurement is the step people get wrong, and a bad offset produces a first layer that’s too high or gouged into the bed.
BLTouch vs CR Touch Compared
Here is how the two stack up on the factors that actually decide the purchase, based on installing and running both across several machines.
| Factor | BLTouch (Antclabs) | CR Touch (Creality) |
|---|---|---|
| Sensing method | Hall-effect (magnetic) | Optical (photoelectric) |
| Pin material | Push-pin (metal, V3.1) | All-metal from the start |
| Heat tolerance | Good (genuine units) | Excellent |
| Typical price | $35–45 genuine | $15–22 |
| Firmware setup | BLTOUCH in Marlin/Klipper | Identical (reports as BLTOUCH) |
| Self-test on boot | Yes (pin cycles) | Yes |
| Clone risk | High (many fakes) | Low (single source) |
| Best for | Established ecosystems, brand trust | Budget builds, high-heat printing |
Accuracy and Repeatability
On the bench, both probes deliver repeatability well inside the tolerance that matters for a first layer — single-digit-micron variation between repeated probes of the same point, which is far finer than any first-layer gap you’d actually print. I’ve run the M48 probe-repeatability test on both and neither showed drift that would ever show up in a print. Anyone telling you one is dramatically more accurate than the other is selling something.
What actually decides your first-layer quality is not the probe brand but the install: a probe mounted with any wobble, a wrong Z-offset, or a dirty bed will ruin the result regardless of which sensor you bought. Get the probe rigidly mounted, measure the offset carefully, and clean the plate with isopropyl alcohol, and either probe will give you the hands-off first layer that makes ABL worth installing in the first place. If your first layers are still inconsistent after a good install, the problem is usually elsewhere — work through the common failure diagnostic before blaming the probe.
Which One I’d Actually Buy
For most people adding ABL to a budget printer, the CR Touch is the smarter buy: it’s cheaper, the metal pin and optical sensor are more abuse-tolerant, and there’s effectively no risk of buying a counterfeit. I’d reach for it on any high-heat or hard-used machine. The BLTouch earns its premium if you want the original with the broadest community documentation and you’re certain you’re buying a genuine Antclabs unit — the marketplace is flooded with clones that look identical and fail within weeks.
Whatever you choose, an ABL probe is one of the highest-return upgrades you can make, second only to a good build surface and dry filament. If you’re still deciding whether your printer is worth upgrading at all versus replacing, my printer buying framework and the 2026 buyer’s guide walk through where that line sits. For a machine that’s mechanically sound, adding a probe is one of the best fifteen dollars you’ll spend.
A quick note: some links below are affiliate links — if you buy through them I may earn a small commission at no extra cost to you. I only point to gear I would actually run on my own bench. Details on my disclaimer page.
If you’re adding ABL, I’d start with a CR Touch kit for a budget or high-heat machine, or a genuine Antclabs BLTouch V3.1 if you want the original — and grab a probe extension cable so you’re not splicing the short factory lead.
Frequently Asked Questions
Is CR Touch better than BLTouch?
For most budget builds, yes. The CR Touch uses an all-metal pin and an optical sensor that tolerate heat and crashes better, and it costs roughly half as much. The BLTouch is the original with wider documentation but carries a high risk of counterfeits.
Are BLTouch and CR Touch interchangeable?
Effectively yes. The CR Touch was designed as a drop-in BLTouch replacement, uses the same five-wire harness, and reports itself as a BLTOUCH probe in firmware. You do not change your Marlin or Klipper configuration when swapping between them.
Does CR Touch work with Marlin firmware?
Yes. The CR Touch is configured exactly like a BLTouch in Marlin. You enable the BLTOUCH option, set your nozzle-to-probe offset, turn on bilinear bed leveling, and add a G29 command to your start G-code.
How accurate are BLTouch and CR Touch?
Both deliver single-digit-micron repeatability on the M48 test, far finer than any printable first-layer gap. Accuracy differences between the two are negligible in practice. Mounting rigidity, a correct Z-offset, and a clean bed matter far more than the brand.
Why does my BLTouch pin not deploy?
Usually a wiring fault on the servo control trio, a bent or jammed pin, or a missing self-test command. Check the three-wire control connection first, confirm the pin moves freely by hand, and verify the firmware sends an M280 deploy on boot.
Do I still need a BLTouch on a modern printer?
No. Machines like the Prusa MK4S, Bambu P1S, and Creality K1C use built-in loadcell or eddy-current probing and never need an add-on probe. A BLTouch or CR Touch is for adding auto bed leveling to older or budget manual-leveling printers.