Input shaping is the firmware feature that cancels the ringing and ghosting — the faint echoes you see after sharp corners — that appear when a printer moves fast. An accelerometer measures each axis’s resonant frequency, and the motion system pre-shapes every move to avoid exciting it, so you can run 8,000–20,000 mm/s² of acceleration and still get crisp corners. It’s the single upgrade that turned fast printing from a gimmick into something I use daily.
Without input shaping, cranking acceleration just smears every corner into a ghost; with it, my P1S and MK4S hold sharp detail at speeds that would have been a blurry mess five years ago. It’s one of the highest-value items in the 3D printer upgrades guide precisely because it’s mostly free — a firmware feature plus a cheap accelerometer. Here’s how it works, how to measure it, and how to read the results.
What Ringing Actually Is
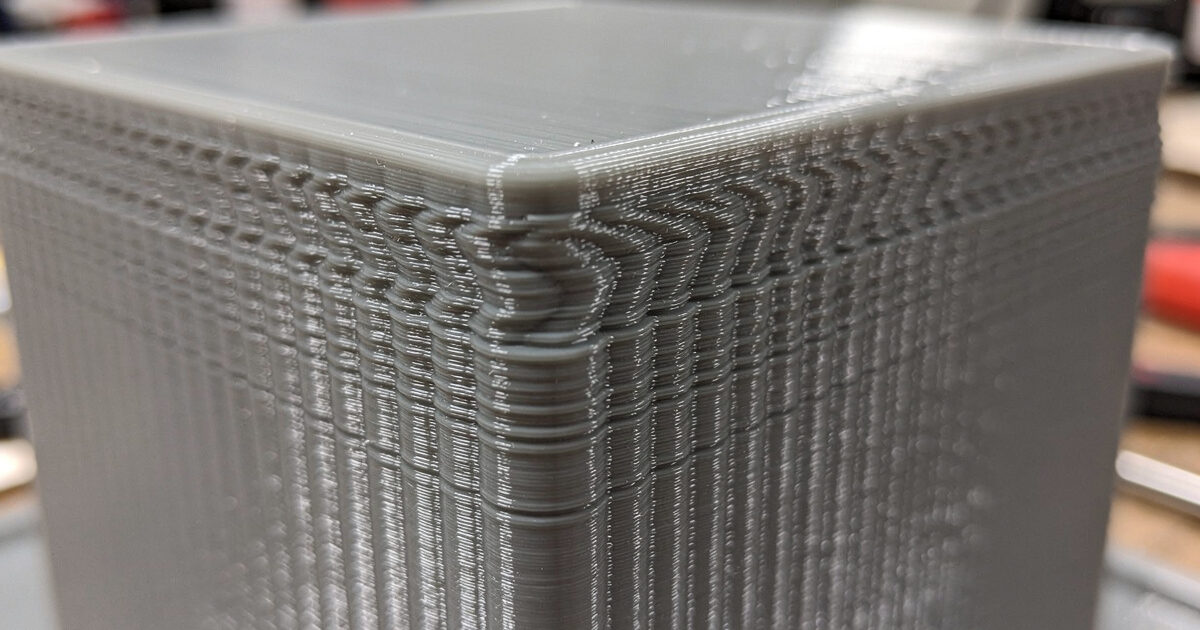
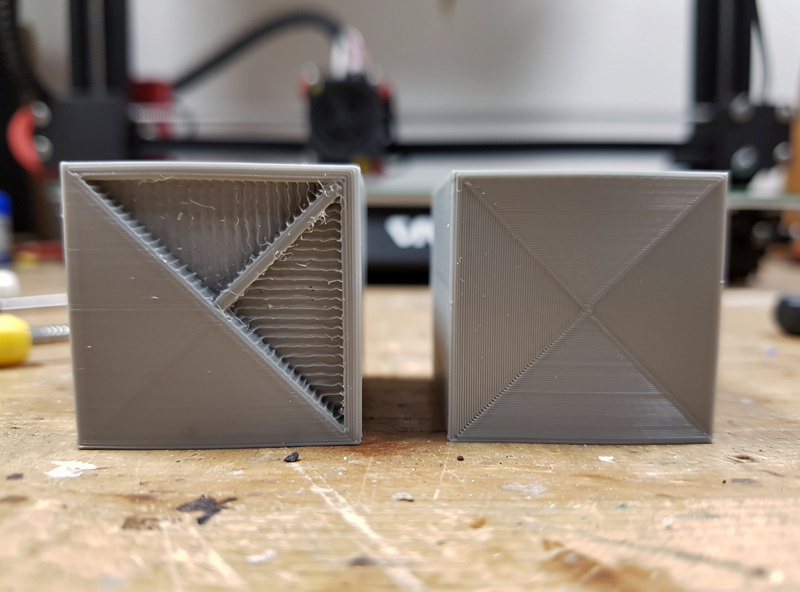
Ringing — also called ghosting or echoing — is a series of fading ripples printed into a surface just past a sharp feature, like the wall after a corner or the edge of an embossed letter. It’s caused by mechanical resonance: when the toolhead or bed suddenly changes direction, the whole structure vibrates at its natural frequency, and the nozzle records that vibration into the plastic. The faster and harder you accelerate, the worse it gets.
That’s why, before input shaping, the only way to get clean corners was to print slowly — low acceleration gave the vibration less energy. Input shaping attacks the root cause instead. By splitting each acceleration command into precisely-timed sub-moves spaced to cancel the resonance, it lets the printer accelerate hard without ever exciting the frequency that causes ringing. The result is fast prints with the surface quality of slow ones, which is the entire reason modern machines feel so much quicker than older ones at the same quality.
Measuring With an Accelerometer
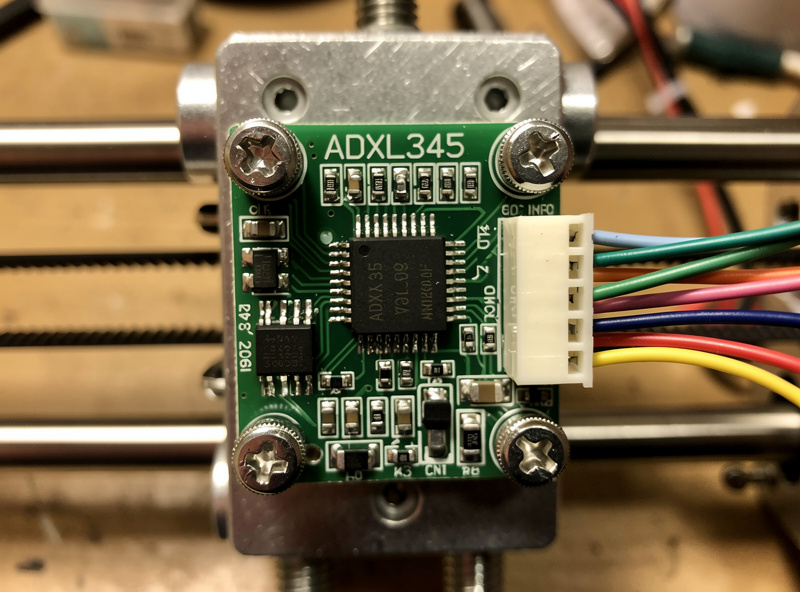
To shape the motion, the firmware has to know the printer’s resonant frequency, and you find that with an accelerometer — typically an ADXL345. You mount it on the toolhead, then on the bed, and run a resonance test that sweeps the axis through a range of frequencies while the accelerometer records the response. The firmware finds the peak — often somewhere in the 40–70Hz range on a typical machine — and that’s the frequency input shaping needs to cancel.
On current machines this is automatic: Bambu printers run a quick resonance calibration at the start of prints using a built-in accelerometer, and the Prusa MK4S has one in the toolhead. On a Klipper build you wire an ADXL345 to the host and run the calibration command, which generates a graph and recommends both a shaper and a safe maximum acceleration. The accelerometer is the same hardware you’d add for a Klipper setup, which is why these two upgrades so often happen together — covered in the Klipper vs Marlin comparison.
Choosing a Shaper Type
Input shaping offers several shaper algorithms, and they trade vibration reduction against how much they smooth (and slightly slow) the motion. The calibration tool recommends one, but it helps to understand the choices.
| Shaper | Vibration Reduction | Smoothing / Speed Cost | Best For |
|---|---|---|---|
| ZV | Lowest | Least (fastest) | Rigid frames, low ringing |
| MZV | Good | Low | Common all-round choice |
| EI | Better | Moderate | More ringing, some smoothing OK |
| 2HUMP_EI | High | Higher | Flexible or tall machines |
| 3HUMP_EI | Highest | Most | Worst-case resonance only |
In practice MZV is the sweet spot for most well-built machines — strong vibration reduction with little speed penalty. I only reach for the heavier EI shapers on a flexier frame where MZV leaves visible artifacts. Don’t just pick the one with the most reduction; the heavier shapers smooth fine detail and cost you the acceleration headroom you installed input shaping to gain.

Input Shaping vs Pressure Advance
People conflate these two, but they fix different problems. Input shaping cancels mechanical ringing from the motion system. Pressure advance (called linear advance in Marlin) manages the pressure of molten plastic in the nozzle, eliminating the corner bulge and the gap after a corner caused by the lag between extruder command and actual flow. You want both, and they’re tuned separately.
Run input shaping first, because a printer that’s ringing will confuse a pressure-advance calibration — you can’t read corner sharpness through a haze of ghosting. Once the motion is clean, tune pressure advance with a test print and dial in the value that gives sharp, bulge-free corners. Together they’re why a modern printer can run fast and still look good, and they pair with a direct-drive setup that gives the extruder the control pressure advance relies on, as I cover in direct drive vs Bowden.
Getting It Right
The most common mistake is mounting the accelerometer loosely — any wobble in the mount adds its own resonance and corrupts the reading, so it has to be bolted solidly to the toolhead. The second is testing only one axis; X and Y usually have different resonant frequencies because the moving mass differs, so measure both and let the firmware shape each independently. The third is chasing the highest acceleration number the calibration allows — the recommended max is a ceiling, not a target, and pushing past comfortable values brings ringing back.
After shaping, verify with a ringing test print: a model with sharp features at the corners, printed at your new acceleration. If the ghosting is gone and corners are crisp, you’re done; if it lingers, re-check the accelerometer mount and the shaper choice. Done right, input shaping is the upgrade that makes every other speed improvement actually usable — there’s no point in a high-flow hotend or a fast slicer profile if the motion turns to mush at speed. It’s the keystone of the whole fast-printing stack in the upgrades guide.
A quick note: some links below are affiliate links — if you buy through them I may earn a small commission at no extra cost to you. I only point to gear I would actually run on my own bench. Details on my disclaimer page.
If your printer doesn’t have a built-in accelerometer, you’ll need an ADXL345 accelerometer module, a Raspberry Pi host to run the resonance calibration, and a set of Dupont jumper wires to connect the accelerometer cleanly.
Frequently Asked Questions
What is input shaping in 3D printing?
It is a firmware feature that cancels ringing and ghosting at high speed. An accelerometer measures each axis’s resonant frequency, and the firmware pre-shapes every move to avoid exciting it, letting you run high acceleration with sharp corners instead of blurry echoes.
Do I need an accelerometer for input shaping?
For automatic tuning, yes. An ADXL345 measures the resonant frequency so the firmware can shape the motion correctly. Bambu and Prusa machines have one built in. On Marlin you can instead measure frequency manually with a printed ringing test tower.
What is the best input shaper to use?
MZV is the best all-round choice for most well-built machines, giving strong vibration reduction with little speed penalty. Heavier shapers like 2HUMP_EI only help flexible or tall frames and cost more detail and acceleration headroom, so use them only when needed.
Is input shaping the same as pressure advance?
No. Input shaping cancels mechanical ringing from the motion system, while pressure advance manages molten plastic pressure to remove corner bulge and gaps. They fix different problems, are tuned separately, and you want both for clean fast prints.
Does Marlin have input shaping?
Yes, modern 32-bit Marlin supports fixed-frequency input shaping through the M593 command. You measure the resonant frequency, with an accelerometer or a ringing test tower, then set it. Klipper’s version is more automated but the underlying effect is the same.
What acceleration can I run with input shaping?
Typically 8,000 to 20,000mm per second squared, depending on the machine, versus a few thousand without it. The calibration recommends a safe maximum. Treat that number as a ceiling, not a target, since pushing past comfortable values brings ringing back.