OrcaSlicer is the slicer of choice for Klipper machines, Voron printers, and anyone who wants every advanced setting exposed. In ~40 words: download from the OrcaSlicer GitHub release page, run through the welcome wizard to import your printer profile, complete the four built-in calibration tests (flow, pressure advance, retraction, max volumetric), then make your first print. The whole setup takes about 90 minutes.
This guide walks through every step from download to first calibrated print. OrcaSlicer’s strength is depth — it’s a fork of Bambu Studio with non-Bambu printer support and a powerful calibration suite built in. The trade-off is complexity. Following this tutorial in order produces a working calibrated setup; skipping the calibration step is the most common mistake that causes new OrcaSlicer users to think the software is broken.
Installation and First Launch
Download OrcaSlicer from the official GitHub releases page (search “OrcaSlicer GitHub”). Avoid third-party download mirrors — fakes have appeared. As of 2026 the current stable release is OrcaSlicer 2.2.x. Windows, macOS, and Linux installers are all available on the same release page.
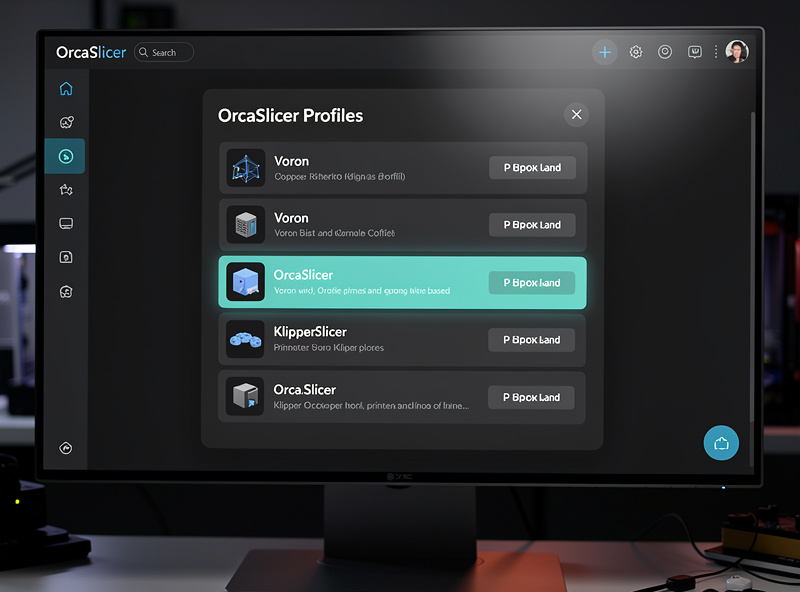
Install with default options. On first launch, OrcaSlicer presents a welcome wizard that asks for your printer model. The library covers Voron, Sovol, Creality, Anycubic, Bambu (yes, even though Bambu Studio is the official choice for those), Prusa, and dozens of less-common machines. Pick the closest match to your printer.
If your specific printer isn’t listed, pick the manufacturer’s similar model and adjust the build volume in printer settings. For example: a Sovol SV08 owner whose machine isn’t listed can pick “Voron 2.4 350” and adjust to match the SV08’s actual print area. The base profile carries over correctly for most settings.
Choose at least one filament profile during the wizard — typically PLA from a brand you actually use (Polymaker, Sunlu, Esun). You can add more later from the filament library or create custom profiles for specific spools.
Connecting OrcaSlicer to Your Printer
OrcaSlicer supports four ways to send G-code to a printer: SD card export (universal), Klipper / Moonraker direct upload (preferred for Klipper machines), OctoPrint plug-in upload, and Bambu Cloud (for Bambu hardware).
For Klipper machines, set up Moonraker integration in Printer Settings → Network. Enter your printer’s local IP, the Moonraker port (default 7125), and OrcaSlicer will detect the printer’s status, queue prints, and start prints remotely. This is the smoothest workflow if you have a Klipper-running printer.
For non-Klipper printers, the SD card workflow works fine. Slice the model, click “Export to SD card,” save to your USB SD card reader, eject, plug into the printer. Slower than Klipper integration but reliable.
OctoPrint integration requires the OrcaSlicer plug-in installed in OctoPrint. Once configured, you can upload sliced G-code directly from OrcaSlicer to OctoPrint’s queue. Useful for non-Klipper printers that have OctoPrint running.
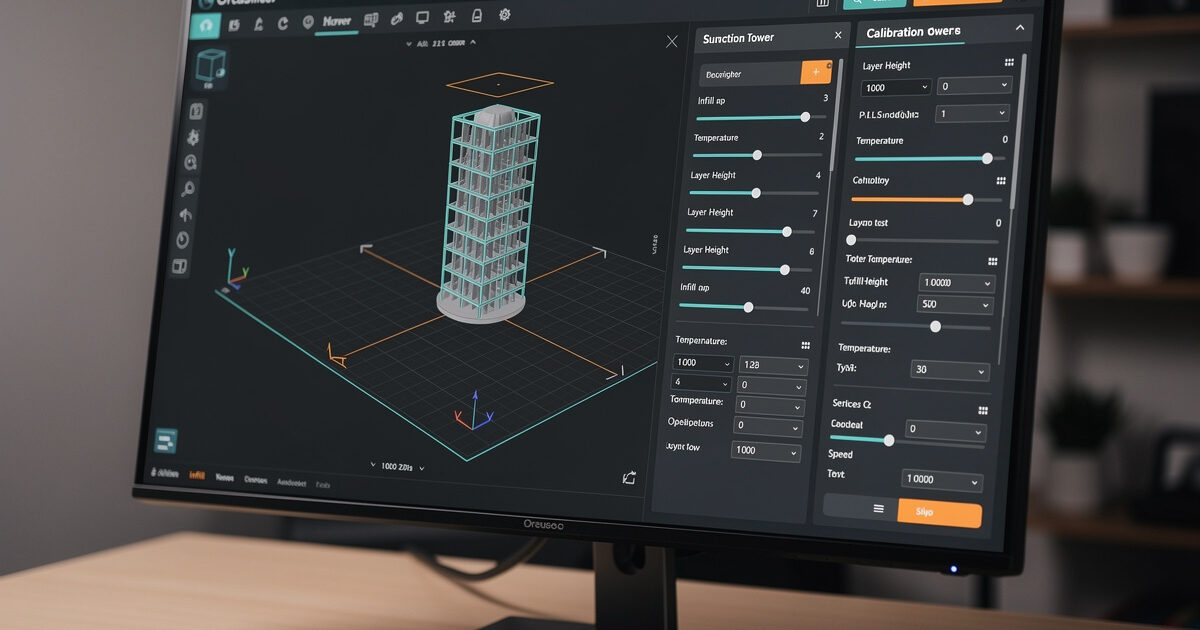
The Calibration Suite (Critical First Step)
OrcaSlicer’s calibration suite is its single most-important feature. Skipping calibration produces stringy, weak prints that make users think OrcaSlicer is worse than Cura — when actually the slicer just isn’t tuned for the printer-and-filament combination yet.
Access the calibration menu via Calibration → in the menu bar. Four tests matter most: Flow Rate, Pressure Advance, Max Volumetric Speed, and Retraction. Run each test once per filament you regularly print with. Total time: 60-90 minutes for one filament; subsequent filaments take 30-45 minutes.
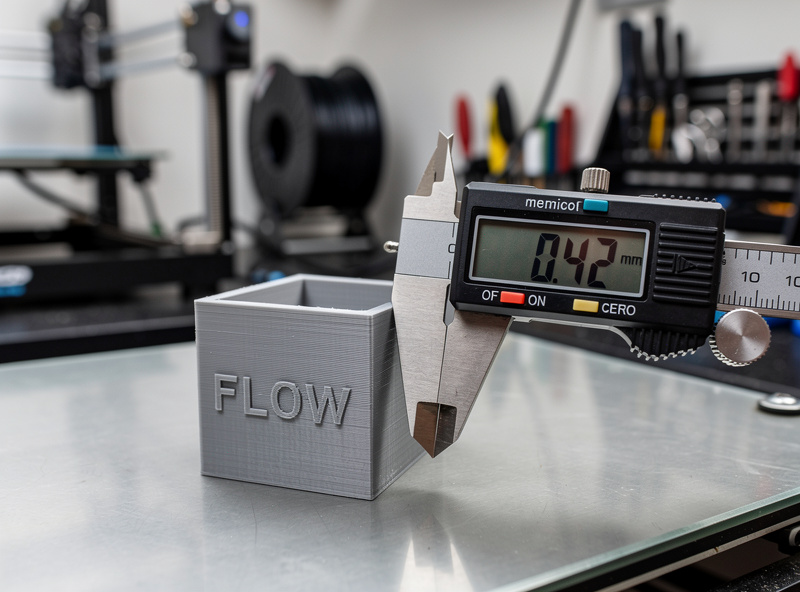
Flow rate calibration: Print a single-walled cube with 100% infill and 0 top/bottom layers. Measure each wall thickness with calipers. Divide your nozzle line width (0.4mm) by the measured average and multiply by 100 — that’s your flow percentage. Most stock filaments need 95-105% flow.
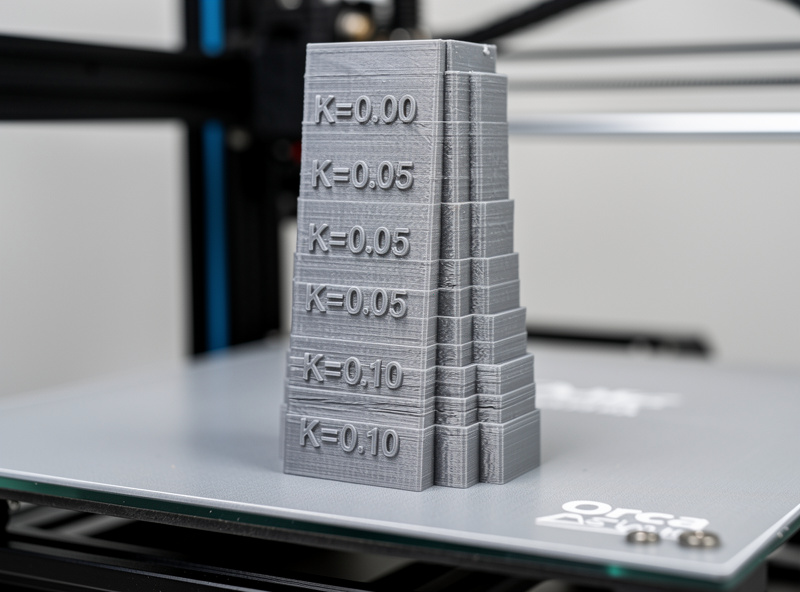
Pressure advance: OrcaSlicer prints a tower with progressive K-factor values. Find the band where corner bulging disappears — that’s your optimal value. Klipper machines typically land at 0.04-0.06; Marlin direct-drive machines around 0.04; Bowden setups higher.
Max volumetric speed: Tests how fast your hotend can actually melt and extrude filament. Run the volumetric tower; find the speed where extrusion starts to fail (lines become thin or stringy); back off 10%. Most stock 0.4mm hotends top out around 12-15mm³/s; high-flow hotends 25mm³/s+.
Retraction tower: Tests retraction distance vs stringing. Find the value where strings disappear without causing under-extrusion at the start of the next move. Direct drive: typically 0.6-1mm; Bowden: 4-6mm.
Your First OrcaSlicer Print
After calibration, slice a benchy or calibration cube as your verification print. Load the model (drag-and-drop into the OrcaSlicer window), select your calibrated filament profile, click “Slice,” then “Send” to your printer or “Export” to SD card.
Watch the first layer carefully. If the line spacing looks wrong or the lines aren’t bonding, your bed leveling needs adjustment — not your slicer settings. OrcaSlicer’s first-layer settings are sensible; first-layer issues are nearly always physical.
If the first layer looks good, let the print finish. A clean benchy with sharp corners, no stringing between hull windows, and a flat bottom indicates the calibration worked. A benchy with corner bulging or visible stringing means one calibration test missed — re-run pressure advance for bulging, retraction for stringing.
For context on what to look for in a benchy print, see our 3D printing troubleshooting guide. The visual symptoms point clearly to which calibration value needs adjustment.
Key OrcaSlicer Settings That Differ from Cura
Coming from Cura, several OrcaSlicer settings have different names or defaults. Knowing the translations saves troubleshooting time.
Wall count is “Wall loops”: OrcaSlicer calls perimeters “Wall loops.” Default is 2; Cura’s default is 3. Increase to 3 for functional parts.
Infill density default differs: OrcaSlicer defaults to 15% sparse infill (vs Cura’s 20%). The pattern defaults to gyroid in both, which is the right answer.
Print speed organization: OrcaSlicer’s speed settings are split across “Outer wall,” “Inner wall,” “Sparse infill,” and “Top surface” — more granular than Cura. Default speeds are aggressive (200mm/s+ on capable printers); you may need to drop these on stock hardware.
Acceleration is per-feature: OrcaSlicer lets you set different accelerations for outer walls, inner walls, infill, and travel. Cura offers a single acceleration value with multipliers. The granular control is OrcaSlicer’s advantage but adds complexity.
Pressure advance is native: OrcaSlicer has pressure advance as a built-in slicer setting. Cura requires a plug-in. This is the main reason OrcaSlicer beats Cura for Klipper machines.
Our slicer comparison guide covers when switching from Cura to OrcaSlicer is worth the learning-curve investment.
Multi-Color and Multi-Material in OrcaSlicer
OrcaSlicer supports both Bambu’s AMS (when slicing for Bambu printers) and manual filament-change workflows for non-AMS multi-color. The setup is in Filament Settings → Multi-extruder.
For manual color changes (M600 pause workflow), assign filaments to the model’s parts in the OrcaSlicer object picker. The slicer inserts M600 commands at the correct layer changes, your printer pauses for filament swap, and you continue. Less smooth than AMS but works on any single-extruder printer.
For AMS prints (Bambu hardware), OrcaSlicer is competent but lags Bambu Studio’s polished AMS workflow by 6-12 months. If you have Bambu hardware doing multi-color, stay on Bambu Studio. OrcaSlicer is the right answer for non-Bambu multi-color setups.
Frequently Asked Questions
Is OrcaSlicer better than Bambu Studio for Bambu printers?
No — for Bambu hardware, Bambu Studio’s factory-calibrated profiles include input shaping coefficients and Lidar first-layer values OrcaSlicer cannot match. OrcaSlicer is better for non-Bambu printers, especially Klipper machines. On Bambu hardware specifically, Bambu Studio still wins.
Does OrcaSlicer support Marlin printers?
Yes. OrcaSlicer supports Marlin firmware printers including Ender 3 series, Anycubic Kobra, Sovol SV06, and dozens of others. Marlin’s pressure advance support exists but is less mature than Klipper’s, so the slicer’s pressure advance feature provides smaller gains on Marlin machines than on Klipper.
How long does OrcaSlicer calibration take?
60-90 minutes for the first filament including print and measurement time. Each subsequent filament with the same hardware takes 30-45 minutes. The four critical tests are flow rate, pressure advance, max volumetric speed, and retraction. Skipping calibration produces sub-Cura quality.
Can I import Cura profiles into OrcaSlicer?
Not directly — the parameter naming and behavior differ. What does transfer manually: filament temperatures, bed temperature, retraction distance, and your pressure advance K-factor (with adjustment). Plan to rebuild the filament profile in OrcaSlicer rather than importing.
Why is OrcaSlicer’s print speed default so aggressive?
OrcaSlicer’s defaults assume Klipper firmware with input shaping enabled, where 250mm/s+ is sustainable. For stock Marlin printers, drop outer wall speed to 60mm/s and infill to 100mm/s to avoid quality degradation. The defaults are calibrated for high-performance machines.
Does OrcaSlicer work with OctoPrint?
Yes via the OrcaSlicer OctoPrint plug-in. Once installed in OctoPrint, you can upload sliced G-code directly from OrcaSlicer to OctoPrint’s queue and start prints remotely. The integration is less polished than Klipper/Moonraker but works reliably for non-Klipper machines running OctoPrint.
What’s the difference between OrcaSlicer and Bambu Studio?
OrcaSlicer is a community-maintained fork of Bambu Studio that adds: native non-Bambu printer support, more advanced calibration tools, exposed parameters Bambu hides, and Klipper-specific features. Bambu Studio remains better for actual Bambu hardware due to factory profiles and direct Bambu Cloud integration.