Your Environment Determines Your Success
My printer lives in the same Sweden workshop as the welder, the CNC, and the laser — so I have had to think hard about where it sits, how the fumes get out, and how to keep filament dry through a damp Nordic winter. The space around the printer matters more than beginners expect: temperature swings cause warping and layer separation, poor ventilation puts emissions in the air you breathe, and sloppy storage quietly ruins filament. This guide is how I would set up a print space that works with you instead of sabotaging every third print — location, ventilation, enclosure, filament storage, and the safety gear I keep within reach.
Whether you print from a dedicated workshop, a spare bedroom, a garage, or an apartment corner, these principles scale to the space you have. The goal is an environment that enables consistent printing instead of one you are constantly fighting. (I print FDM; resin is a different beast with stricter ventilation needs, and I flag those parts as what resin users deal with.)
A quick note: some links below are affiliate links — if you buy through them I may earn a small commission at no extra cost to you. I only point to gear I would actually run in my own workshop. Details on my disclaimer page.
Choosing and Preparing Your Print Location
Printer placement affects everything from noise management to temperature stability. Thoughtful location selection prevents problems before they require solutions.
Location Selection Criteria
Choose spaces with stable ambient temperatures between 18-25°C (64-77°F). Avoid drafty areas near windows, exterior doors, air conditioning vents, or heating registers. Temperature swings cause inconsistent cooling rates, particularly problematic for ABS, ASA, and nylon. Basements often provide excellent temperature stability but may have humidity concerns. Garages work if climate-controlled; otherwise, seasonal temperature extremes cause print failures.
Consider noise impact on household members. Printers produce 50-70 decibels of mechanical noise and fan whine continuously during multi-hour prints. Bedroom placement works only with silent stepper drivers and tolerance for operational sounds during sleep. Living areas require family acceptance of background noise. Dedicated workshops or spare rooms provide optimal separation.
Floor loading matters for larger printers—machines weighing 15-25kg concentrate weight on small footprints. Verify your surface can support the printer without wobbling or vibration transmission. Solid workbenches, sturdy tables, or dedicated printer stands work better than folding tables or temporary surfaces.
Electrical Considerations
3D printers draw significant power during heated bed and hot end operation. A typical printer consumes 50-150 watts continuously with 300-500 watt peaks during initial heating. Verify your electrical circuit can handle the load without tripping breakers. Avoid extension cords where possible; if necessary, use heavy-duty cords rated for the printer’s amperage draw. Position printers near grounded outlets and consider surge protectors for areas with unstable power.
Ventilation and Fume Management
All 3D printing produces emissions, though risk levels vary dramatically by technology and material. Understanding and managing these emissions protects your respiratory health and enables printing materials that would otherwise be unsafe indoors.
FDM Emissions and Safety
PLA printing emits lactide, generally considered low-toxicity but not entirely benign. ABS and ASA release styrene, a known respiratory irritant with potential carcinogenicity under chronic exposure. Nylon emits caprolactam, which irritates airways. PETG produces fewer emissions than ABS but still requires ventilation. Carbon fiber and exotic filaments may release additional compounds from additives and coatings.
Symptoms of inadequate ventilation include headaches, throat irritation, and respiratory discomfort during or after printing sessions. While acute poisoning is unlikely at hobby exposure levels, chronic exposure to printing emissions remains unstudied for long-term health effects. Prudent operators implement ventilation regardless.
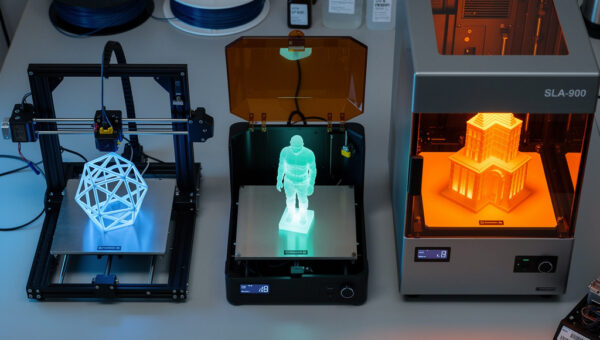
Resin Printing Ventilation Requirements
Resin printing demands strict ventilation because photopolymer resins release volatile organic compounds (VOCs) including acrylates and methacrylates. These cause respiratory irritation, skin sensitization, and potential allergic reactions with repeated exposure. Isopropyl alcohol used for washing prints adds additional fumes. Resin printers should never operate in living spaces without dedicated exhaust systems. For the complete protocol on glove selection, ventilation setups, spill handling, and safe resin disposal, the resin printing safety guide covers everything before your first bottle arrives.
Ventilation Solutions
Window Exhaust: The simplest solution places printers near windows with box fans exhausting outward. This works for temperate climates but fails during extreme weather when windows remain closed. Position fans to create airflow across the print area, not just general room ventilation.
Enclosure Ventilation: Printer enclosures with integrated exhaust systems provide the best emission control. Air enters through filtered intakes, circulates through the chamber removing fumes and heat, then exhausts outside through ducting. This approach benefits both health and print quality by maintaining controlled internal temperatures. DIY enclosure builds using IKEA cabinets, grow tents, or custom wood frames cost $100-300 plus ventilation components.
Air Filtration: HEPA filters remove particulates but not VOCs. Activated carbon filters adsorb organic compounds including styrene and resin fumes. Quality air purifiers with substantial carbon beds (not token carbon coatings) provide reasonable fume reduction for FDM printing in spaces without external exhaust options. For resin printing, filtration is secondary to ventilation—exhaust fumes outside rather than filtering and recirculating.
Printer Enclosures: Benefits and Implementation
Enclosures serve dual purposes: containing heat for temperature-sensitive materials and containing emissions for health protection. Even printers marketed as “enclosed” often benefit from additional sealing and ventilation modifications.
Enclosure Benefits
ABS, ASA, polycarbonate, and nylon require enclosed chambers maintaining 35-45°C internal temperatures to prevent warping and layer separation — if you print these often, a factory-enclosed machine earns its keep (see my best enclosed printers for ABS). The enclosure traps heat from the bed and electronics, creating the stable thermal environment these materials demand. Enclosures also reduce noise, block drafts that cause cooling-related failures, and provide mounting points for lighting and cameras.
DIY Enclosure Options
Lack Enclosure: The IKEA LACK table (55x55x45cm) provides a popular, inexpensive foundation. Two tables stacked create the chamber; acrylic or polycarbonate panels seal the sides. Total cost under $100 with excellent community documentation and modification options.
Grow Tents: Hydroponic grow tents offer reflective interiors, zipper access, and built-in duct ports perfect for ventilation. They come in a range of sizes to suit most printers. Internal racks support printers while external access allows maintenance. Reflective interiors improve visibility and light distribution.
Custom Builds: Extruded aluminum framing with polycarbonate or acrylic panels creates professional-grade enclosures customized to your printer and workflow. Higher cost ($200-500) but optimal fit and feature integration. Include acrylic doors for visibility, filtered intake vents, and exhaust duct connections.
Enclosure Ventilation Design
Enclosure airflow should create negative pressure—exhausting more air than enters—to prevent fume leakage. Calculate cubic feet per minute (CFM) requirements: aim for 3-5 air changes per hour minimum. A 4 cubic foot enclosure requires 12-20 CFM airflow. Standard 120mm computer fans provide 50-100 CFM, sufficient for most printer enclosures.
Position intake low and exhaust high to leverage thermal stratification—hot air rises and carries fumes upward. Use carbon filters on intakes to reduce dust ingress; use carbon or HEPA filters on exhausts if recirculating rather than venting outdoors (though outdoor venting remains preferable). Monitor internal temperatures with thermometer/hygrometer combinations—excessive heat affects electronics and can cause PLA heat creep issues.
Filament Storage and Management
Most 3D printing filaments are hygroscopic—they absorb atmospheric moisture. Wet filament causes popping sounds, steam bubbles, poor layer adhesion, and brittle prints (see my full guides to drying filament and storing it against humidity). Proper storage extends material lifespan and ensures consistent print quality.
Understanding Moisture Impact
Nylon absorbs moisture within hours of exposure, becoming unprintable without drying. PETG and PLA absorb more slowly but still suffer quality degradation over weeks or months. Wet filament passing through hot ends boils the moisture, creating voids and inconsistent extrusion. The issue compounds because saturated filament in spool hubs continues feeding moisture even if exterior layers seem dry.
Storage Solutions by Budget
Basic: Store opened spools in resealable bags with desiccant packets. Silica gel, indicating desiccant (color-changing when saturated), provides visual moisture monitoring. Replace or recharge desiccant regularly—oven-dry at 120°C for 2-3 hours to regenerate. Vacuum-sealing bags provide better protection than zipper bags but add cost and workflow friction.
Intermediate: Airtight plastic storage bins with sealed lids and bulk desiccant protect multiple spools. Include humidity indicators to monitor conditions. This approach works for moderate collections (10-30 spools) and provides protection equivalent to vacuum sealing when properly sealed.
Advanced: Heated filament storage cabinets or dry boxes maintain low humidity actively. PrintDry systems and DIY heated storage using temperature-controlled elements and desiccant maintain optimal conditions continuously. For workshops in humid climates or users printing engineering materials regularly, heated storage pays for itself in reduced failed prints and material waste.
Filament Drying Procedures
When filament becomes wet, drying restores printability. Food dehydrators work excellently for spool drying—4-6 hours at 45-50°C for PLA/PETG, 6-8 hours at 60-65°C for nylon and ABS. Oven drying works but risks uneven heating and spool warping—use lowest settings with door cracked for convection. Specialized filament dryers ($50-150) provide controlled temperature and spool rotation for even drying. Never exceed material glass transition temperatures during drying or spools deform permanently.
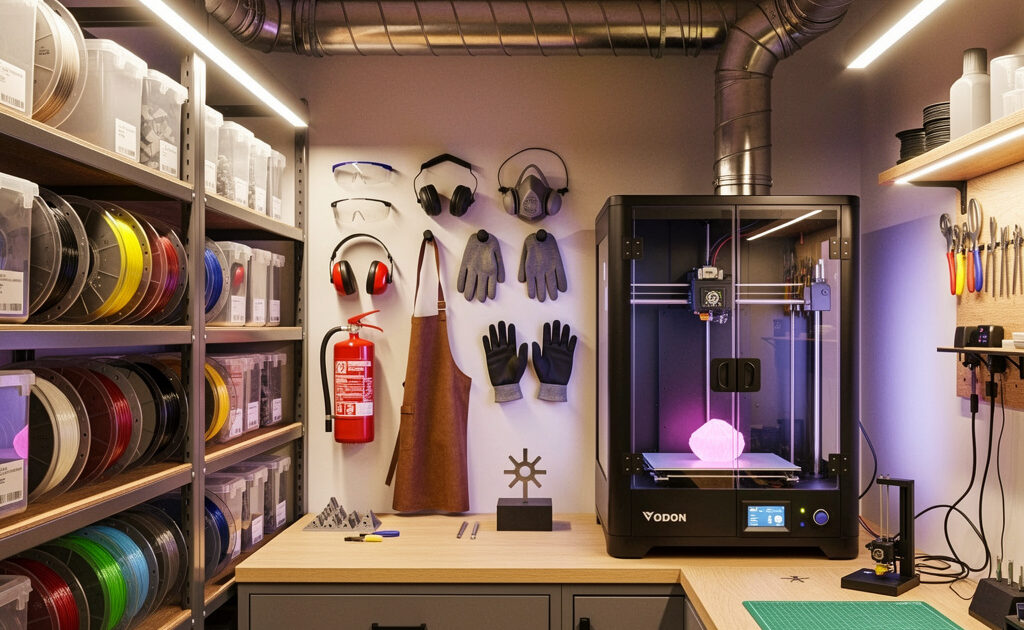
Workspace Organization and Ergonomics
Efficient 3D printing workflows require organized access to tools, materials, and post-processing equipment. Disorganized spaces increase print failure rates because operators skip steps or use incorrect settings to avoid searching for proper tools.
Essential Tool Organization
Dedicate specific storage for: bed scrapers and removal tools, nozzle cleaning needles and cold pull filament, calipers for dimensional checking, hex keys and screwdrivers for printer maintenance, deburring tools and flush cutters for support removal, sandpaper assortment (120-800 grit), adhesives and bonding agents for assembly. Pegboards, drawer organizers, or dedicated tool chests keep these accessible without cluttering primary workspace.
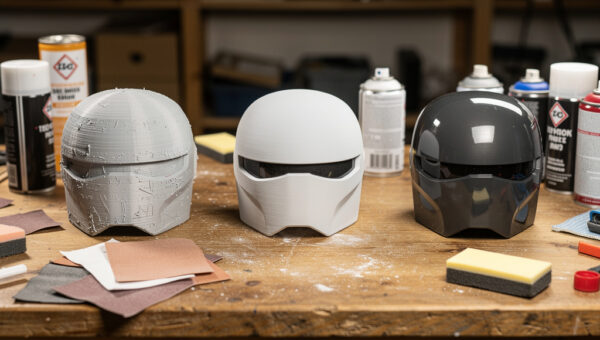
Post-Processing Area Setup
Separate post-processing from printing areas when possible. Sanding produces dust that affects printer electronics; acetone vapor smoothing requires ventilation incompatible with active printers. Designate specific areas for: support removal and initial cleaning, sanding and surface preparation, painting and finishing, assembly and hardware installation. Include appropriate surfaces—disposable cardboard for painting, easy-clean surfaces for chemical work, anti-static mats for electronics handling.
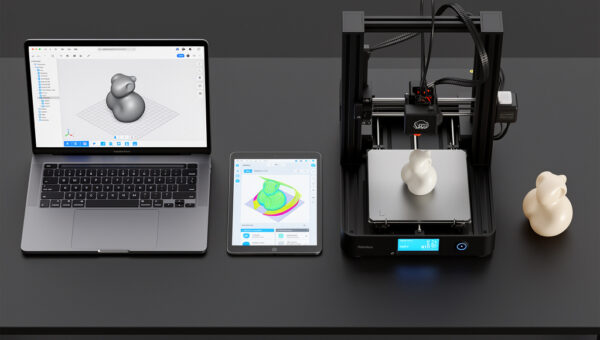
Computer and Slicer Station
Dedicated computer access near the printer enables monitoring, quick slicer adjustments between prints, and file management without running between rooms. If space permits, position a laptop or tablet within view of the print bed for active monitoring. For resin printing, the computer station should include inventory tracking for resins, wash alcohol, and PPE supplies.
Safety Equipment and Protocols
Personal protective equipment (PPE) and safety protocols prevent injuries ranging from minor burns to respiratory damage. Establishing these habits early prevents complacency that leads to accidents.
Essential PPE
Nitrile gloves protect against resin contact (which causes skin sensitization) and hot end burns during nozzle changes. Keep multiple sizes available—tight gloves reduce dexterity; loose gloves risk catching on printer components. Safety glasses prevent eye injuries from flying debris during support removal or component failure. For resin work, consider nitrile-coated gloves for improved grip when handling wet, slippery prints.
Respiratory protection becomes necessary for extended resin printing or when sanding/cutting printed parts. N95 masks filter particulates from sanding; organic vapor respirators with appropriate cartridges protect against resin and solvent fumes. Never rely on cloth masks or surgical masks for fume protection—they provide only psychological comfort, not actual safety.
Fire Safety
While rare, 3D printer fires occur from thermal runaway (failed temperature control), electrical shorts, or flammable material contact with hot ends. Install smoke detectors in printing areas. Never leave high-temperature printers (ABS, nylon, PC) unattended without thermal runaway protection enabled in firmware. Keep a fire extinguisher rated for electrical fires (Class C) accessible—not buried behind printer enclosures. Consider automatic fire suppression systems (like FireAvert or DIY solutions with thermal fuses) for printers operating in unattended spaces.
Chemical Safety
Store isopropyl alcohol, acetone, and other solvents in appropriate containers away from ignition sources. Label all secondary containers clearly. Maintain Safety Data Sheets (SDS) for all chemicals present. For resin printing, establish protocols for spilled resin cleanup (paper towels, then IPA wipes) and skin contact response (soap and water immediately; seek medical attention if irritation develops). Never dispose of uncured resin or IPA wash solution down drains—cure waste resin with UV light, then dispose as solid waste according to local regulations.
Environmental Monitoring
Tracking ambient conditions enables diagnosing mysterious print failures caused by environmental factors. Simple monitoring tools provide data that prevents frustration.
Temperature and Humidity Monitoring
Digital hygrometers/thermometers are cheap and provide essential data. Track readings before failed prints—you may discover patterns like high humidity causing PETG stringing or temperature drops triggering ABS warping. Ideal printing environments maintain 40-50% relative humidity and stable temperatures.
Remote Monitoring Systems
Smart sensors (like SensorPush or Govee) log environmental data over time, revealing trends invisible to spot checks. These integrate with phone apps alerting you to problematic conditions while away. For serious operators, home automation systems can trigger alerts or activate climate control when conditions drift outside acceptable ranges.
Creating Your Optimal Printing Environment
Workspace optimization is iterative. Start with basic ventilation and storage solutions, then upgrade based on your specific printing habits and encountered problems. The operator printing exclusively PLA in Arizona has different needs than someone printing nylon in humid Florida. Document what works for your environment and evolve your setup accordingly.
With your workspace established for safe, consistent operation, the next article addresses transforming raw prints into finished products. Post-processing techniques including sanding, painting, smoothing, and assembly elevate 3D printing from functional prototyping to professional manufacturing capable of producing consumer-ready goods.
Complete Your Setup
With your workspace established, dive into post-processing to achieve professional finishes. Or start creating with 15 practical projects.