Beyond the Print: Why Post-Processing Matters
Raw 3D prints rarely represent finished products. Layer lines, support marks, surface imperfections, and dimensional tolerances require addressing before parts achieve professional quality. Post-processing transforms printed objects from raw prototypes into refined products suitable for display, assembly, or functional use. Mastering these techniques distinguishes casual hobbyists from skilled manufacturers capable of producing market-ready goods.
This comprehensive guide covers the complete post-processing workflow: surface preparation through sanding and chemical smoothing, cosmetic finishing including painting and coating, mechanical joining methods, and assembly techniques. Whether your goal is functional parts with precise fits or artistic pieces with flawless appearances, these methods elevate your results from amateur to professional.
Surface Preparation: Removing the 3D Printed Look
Layer lines, the visible ridges from additive manufacturing, signal “3D printed” immediately to observers. Removing or minimizing these lines is often the first post-processing priority for aesthetic applications.
Support Removal Techniques
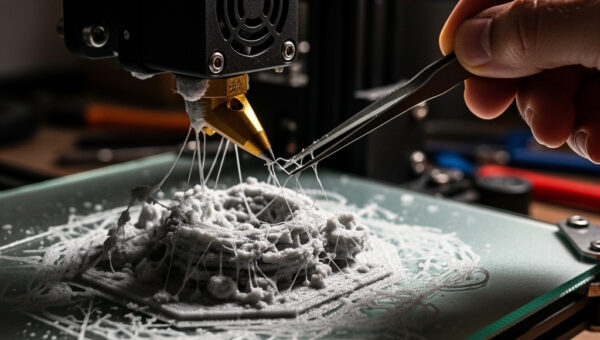
Supports leave contact point marks requiring cleanup. For FDM prints, use flush cutters positioned flat against the surface, snipping supports as close as possible without gouging the part. Follow with deburring tools or craft knives to remove remaining nubs. For internal supports unreachable with tools, needle-nose pliers and patience enable extraction through available openings.
Resin print supports typically attach with small contact points (0.2-0.4mm diameter). Remove by hand while wearing nitrile gloves, carefully twisting supports until they release. Sand contact points flush with 220-grit sandpaper. Never force removal—broken supports leave divots requiring filler or additional sanding.
Sanding Fundamentals
Sanding removes layer lines progressively through abrasive action. Always sand wet when possible—water reduces dust, prevents melting from friction heat, and extends sandpaper life. Work through grit progression: start with 120-grit for aggressive material removal, progress to 220-grit for smoothing, then 400, 600, and finally 800-grit for pre-paint preparation. Skip grits only if previous stage eliminated all scratches from coarser paper.
Use sanding blocks for flat surfaces to maintain flatness—hand sanding creates uneven pressure producing wavy surfaces. For curves and organic shapes, flexible sanding sponges conform to contours. Sand in circular motions rather than back-and-forth to avoid creating directional scratches. Check progress frequently under good lighting; shadows reveal remaining layer lines invisible in direct light.
Power Tool Sanding
Rotary tools (Dremel) with sanding drums speed material removal for large prints or aggressive smoothing. Use light pressure and keep the tool moving—lingering creates heat that melts plastic and ruins surfaces. Random orbital sanders with fine grits accelerate flat surface preparation but risk melting if used aggressively. Always test on sacrificial prints to establish safe speeds and pressures for your specific materials.
Chemical Smoothing: Vapor and Solvent Techniques
Chemical smoothing dissolves surface plastic, flowing material into layer line valleys and creating glossy, injection-mold-quality finishes impossible through sanding alone. These techniques require safety consciousness but produce professional results quickly.
Acetone Vapor Smoothing (ABS and ASA)
Acetone selectively dissolves ABS and ASA without affecting most other materials. Create a vapor chamber using a glass or metal container suspended above a small acetone reservoir (do not submerge parts—vapor only). Warm acetone increases vapor pressure and accelerates smoothing. A few minutes exposure creates glossy surfaces; longer times risk melting fine details.
Safety is paramount: acetone is highly flammable with low flash point. Use only in well-ventilated areas away from ignition sources. Never use plastic containers that dissolve in acetone. Work with minimum acetone quantities—excess creates dangerous vapor concentrations. Allow parts to off-gas outdoors or in ventilated spaces before handling extensively.
Other Solvent Options
MEK (Methyl Ethyl Ketone) smooths ABS similarly to acetone but with slower evaporation and less aggressive action. Ethyl acetate works on PLA, though results vary by brand and formulation. Chloroform historically smoothed PLA but is highly toxic and restricted—avoid due to health risks. Tetrahydrofuran (THF) affects multiple materials but requires extreme ventilation and safety precautions.
Resin prints generally do not respond to solvent smoothing—the photopolymer chemistry creates crosslinked structures resistant to solvent attack. Sanding remains the primary smoothing method for resin parts.
Gap Filling and Surface Repair
Imperfections, layer separation gaps, and support divots require filling before painting or finishing. Several products enable invisible repairs.
Automotive Body Fillers
Bondo and similar polyester fillers work excellently on 3D prints. Mix filler with hardener, apply thinly over imperfections, sand smooth after curing (typically 30 minutes). These fillers sand easily and accept paint well. Multiple thin applications produce better results than single thick layers prone to cracking or poor adhesion.
Specialized 3D Print Fillers
Products like XTC-3D are two-part epoxy resins designed specifically for 3D prints. They self-level, fill layer lines, and create smooth, paintable surfaces with minimal sanding required. Apply with foam brushes in thin coats; thick application runs and sags. Two coats often eliminate visible layer lines entirely on moderately smooth prints.
CA Glue Acceleration
Cyanoacrylate (super glue) fills small gaps and cracks. Apply glue, then accelerator spray (or baking soda dusting) for instant curing. Sand flush immediately while slightly green if perfect flatness required. This technique works well for repairing broken prints or filling minor layer separation.
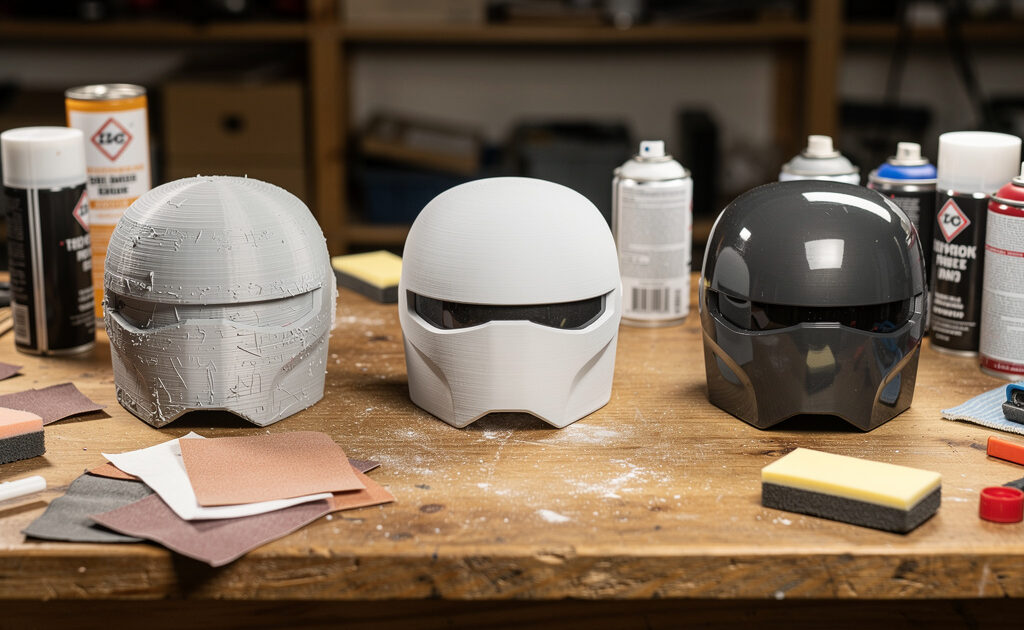
Painting and Coating: Professional Finishes
Painting transforms 3D prints into objects indistinguishable from manufactured goods. Proper preparation and technique yield automotive-quality finishes.
Surface Preparation for Painting
Any remaining layer lines or imperfections telegraph through paint, so thorough sanding to 400-600 grit is essential. Clean surfaces with isopropyl alcohol to remove oils and dust. For maximum smoothness, apply filler primer (automotive primer designed to fill scratches) in light coats, sanding between applications until surfaces are uniformly smooth. Two to three primer/sand cycles often eliminate all evidence of 3D printing origins.
Primer Application
Filler primer (Dupli-Color, Rust-Oleum, or dedicated 3D print primers like Tamiya) provides the foundation. Apply in light, even coats 6-8 inches from surface. Multiple thin coats prevent runs and provide better fill than single thick applications. Allow 15-30 minutes between coats; overnight curing before sanding ensures full hardness.
Paint Selection and Application
Acrylic spray paints (Tamiya, Testors, Krylon, Rust-Oleum) adhere well to prepared plastic surfaces. For artistic control, brush-on acrylics allow detail work impossible with sprays. Automotive spray paints provide durability and gloss levels from matte to high-gloss. Always test paint compatibility on sacrificial prints—some solvents in paints attack specific plastics.
Apply paint in thin, overlapping coats. Heavy applications run and sag, ruining finishes. Typically 2-3 color coats over primer create full coverage. Allow proper curing times—rushing leads to soft, easily damaged finishes.
Clear Coats and Protection
Clear coats protect painted surfaces and adjust gloss levels. Matte clear maintains non-reflective finishes; satin provides subtle sheen; gloss creates shiny, reflective surfaces. Automotive clear coats offer maximum durability for handled parts. Apply clear coats in light, even layers allowing flash times between applications.
Advanced Finishing Techniques
Beyond basic painting, several techniques create specialized appearances.
Weathering and Distressing
For prop replicas and artistic pieces, weathering adds realism. Dry brushing applies highlight colors to raised edges. Washes (thin dark paints) settle into crevices creating depth. Sponging creates chipped paint effects. These techniques, borrowed from model building and prop making, transform clean prints into realistic, lived-in objects.
Hydro Dipping and Transfer Printing
Hydrographic films apply complex patterns (carbon fiber, camouflage, wood grain) to 3D printed surfaces. The process involves floating patterned films on water, spraying activator chemicals, then dipping the print through the film to transfer the pattern. Requires practice but creates professional finishes impossible through painting alone.
Metal Plating and Electroforming
For genuine metal finishes, electroplating deposits copper, nickel, or chrome onto conductive painted surfaces. Graphite conductive paint provides the base layer for electroplating processes. Alternatively, brush-on metal powders (Alumaluster, similar products) create metallic appearances without electroplating equipment.
Mechanical Joining and Assembly
Large objects or complex mechanisms often require printing in multiple parts for assembly. Several joining methods provide various strength and removability characteristics.
Adhesive Bonding
Super glue (cyanoacrylate) bonds PLA and ABS instantly with excellent strength. Use thin formulas for tight-fitting joints; gel formulas fill gaps. Accelerator sprays cure glue in seconds, enabling rapid assembly. For maximum strength, lightly sand mating surfaces to increase surface area and mechanical bonding.
Two-part epoxies (JB Weld, Devcon) provide stronger, more durable bonds than super glue. Mix resin and hardener, apply to both surfaces, clamp or tape parts together until curing (typically 5-30 minutes handling strength, 24 hours full cure). Epoxy bonds survive impacts and stress better than brittle super glue joints.
Acetone welding (ABS/ASA only) dissolves mating surfaces with acetone application, creating chemical bonds stronger than the material itself. Apply acetone sparingly to both surfaces, press together, and allow drying. This technique produces seamless joints indistinguishable from single-piece prints.
Mechanical Fasteners
Screws and bolts enable disassembly and service. Design parts with clearance holes for screws (diameter slightly larger than screw threads) and pilot holes for self-tapping screws. Brass threaded inserts (heat-set or press-fit) provide durable metal threads in plastic parts, surviving repeated assembly/disassembly without stripping. Helicoil or thread inserts provide industrial-grade threaded holes in load-bearing applications.
Tolerance design is critical—parts intended for assembly need 0.2-0.4mm clearance between mating surfaces. Test fit prints verify tolerances before committing to full prints. PLA and PETG have different shrinkage characteristics; designs verified in PLA may fit differently when printed in PETG or ABS.
Interlocking Joints
Design joints into models eliminating adhesives or fasteners. Dovetails, snap fits, living hinges, and puzzle-style joints create self-retaining assemblies. These require careful tolerance design but enable rapid assembly and disassembly. Kinematic couplings and compliant mechanisms (flexible joints printed as single pieces) demonstrate advanced design capabilities unique to additive manufacturing.
Post-Processing Workflow Optimization
Develop systematic workflows matching your typical applications. Document which techniques work for your printer, materials, and quality requirements. Build tool libraries: sandpaper assortments, paint collections, adhesives, and specialized tools for your common post-processing needs.
Time investment in post-processing often exceeds print time. A three-hour print might require two hours of sanding, filling, and painting for professional results. Budget this time when planning projects and pricing commissioned work. Rush post-processing produces visibly amateur results that undermine the time invested in careful printing.
With post-processing mastery, your prints achieve quality rivaling injection-molded goods or handmade craftsmanship. The final article in this foundation series demonstrates practical applications—projects that solve real problems, save money, and unlock creative possibilities, proving that 3D printing transcends novelty to become genuine manufacturing capability.
]]>Perfect Your Prints
With finishing techniques mastered, apply your skills to practical projects that solve real problems. Or review troubleshooting to avoid issues before they occur.