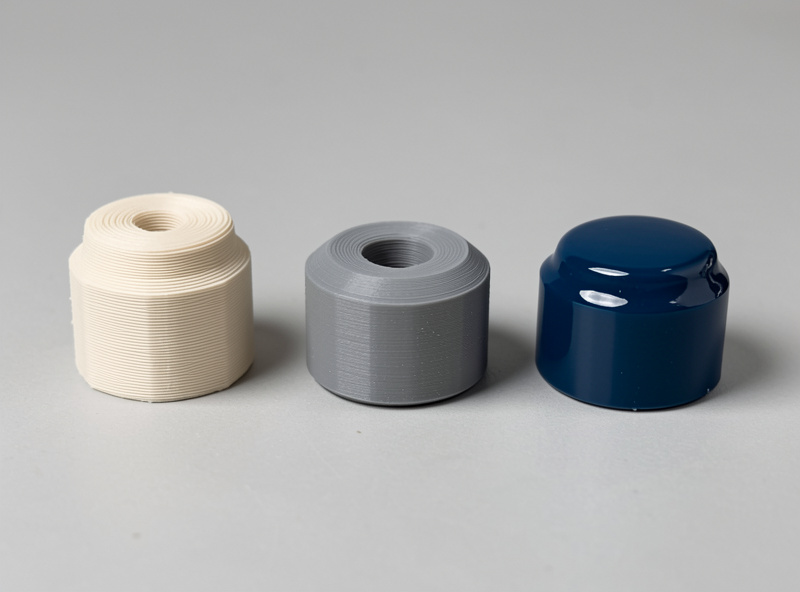
Post-processing is where an FDM print stops looking printed. A full sand-prime-paint-clear cycle is an evening of work, and the single biggest lesson from running it hundreds of times is that finishing is a sequence, not a trick. Skip a step and the next one shows you exactly what you skipped.
Think of what follows as the map for that sequence. I’ll walk the full workflow the way I actually run it on my bench — from pulling supports off a fresh print to laying down a clear coat that survives handling — and explain the decision points at each stage. The goal here isn’t to teach every technique end to end; it’s to show you the order, the forks, and where most people waste an afternoon.
The finishing decision: do you even need it?
Before you reach for sandpaper, ask what the part is for. The functional brackets, sensor mounts, and welder fixtures that come off my Prusa MK4S most weeks get zero cosmetic finishing — I knock the support scars off, deburr the edges, and they go to work. Finishing exists for parts that will be seen, painted, handled by people who didn’t make them, or that need a sealed surface for moisture, UV, or food-contact-adjacent use. Be honest about which bucket your part is in, because a full sand-prime-paint-clear cycle is several hours and a fair amount of consumable cost.
Material matters too. PLA sands beautifully and primes without drama. PETG, which I default to for anything that lives outdoors or under load, is gummier under sandpaper and needs a lighter touch and fresher grit. ABS and ASA are the only common FDM materials that can be chemically smoothed with acetone vapor, which changes the whole strategy — for those, smoothing can replace a lot of sanding. The finishing path forks on material early, so I’ve called that out at each stage below. If you want the broader before-and-after primer, my older post-processing overview is the short version; this guide is the deep workflow.
Stage 1: Clean support removal
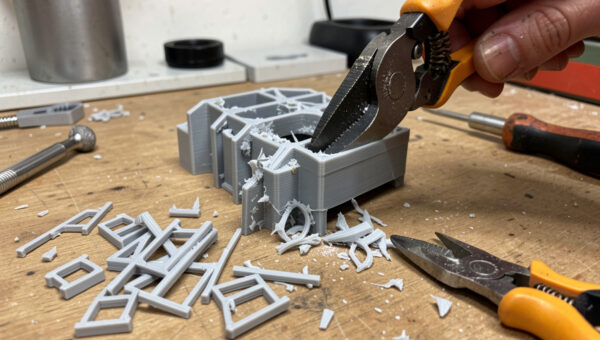
Finishing starts the moment the print comes off the bed, because how you remove supports decides how much sanding you’ll do later. Rushed support removal tears chunks out of the surface or leaves a forest of nubs that turn into visible craters under paint. I pull supports while the part is still slightly warm where I can, use flush cutters rather than fingers on the stubborn interfaces, and accept that a good support-interface setting in the slicer saves more finishing time than any sanding technique.
The cleanest removal is the one you designed for before you hit print. If your supports are fighting you at the slicer stage, my notes on tree supports versus normal supports and custom supports in PrusaSlicer are where the real time savings live — dialing in the support interface gap and placing supports manually means there’s far less scarring to sand out afterward. Get this stage right and every later stage gets shorter.
Stage 2: Sanding
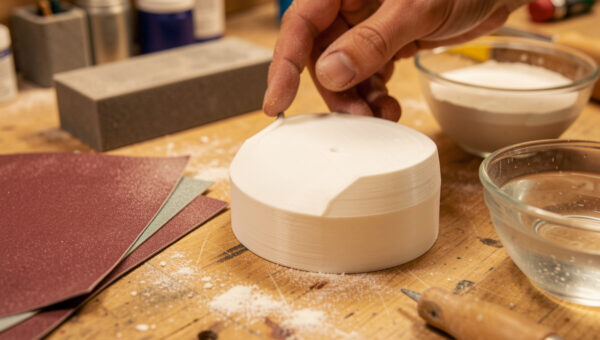
Sanding is the foundation of every cosmetic finish, and it’s the stage people both over- and under-do. The principle is grit progression: you start coarse enough to knock down the layer lines, then step up through finer grits, never skipping more than a step, until the surface is uniform. Jumping from 120 straight to 400 just polishes the scratches the 120 left. Wet sanding from around 400 up keeps the paper from clogging with melted plastic and gives a far cleaner surface, which matters enormously if you’re going for a gloss finish.
I treat sanding as the step that earns every later step. A part sanded properly takes primer evenly; a part sanded lazily shows every missed valley the second primer hits it. The grit ladder matters more than the hours: a methodical pass from coarse to fine beats grinding away at one grit forever. Sanding isn’t a chore to rush through to get to the fun part — it is the finish.
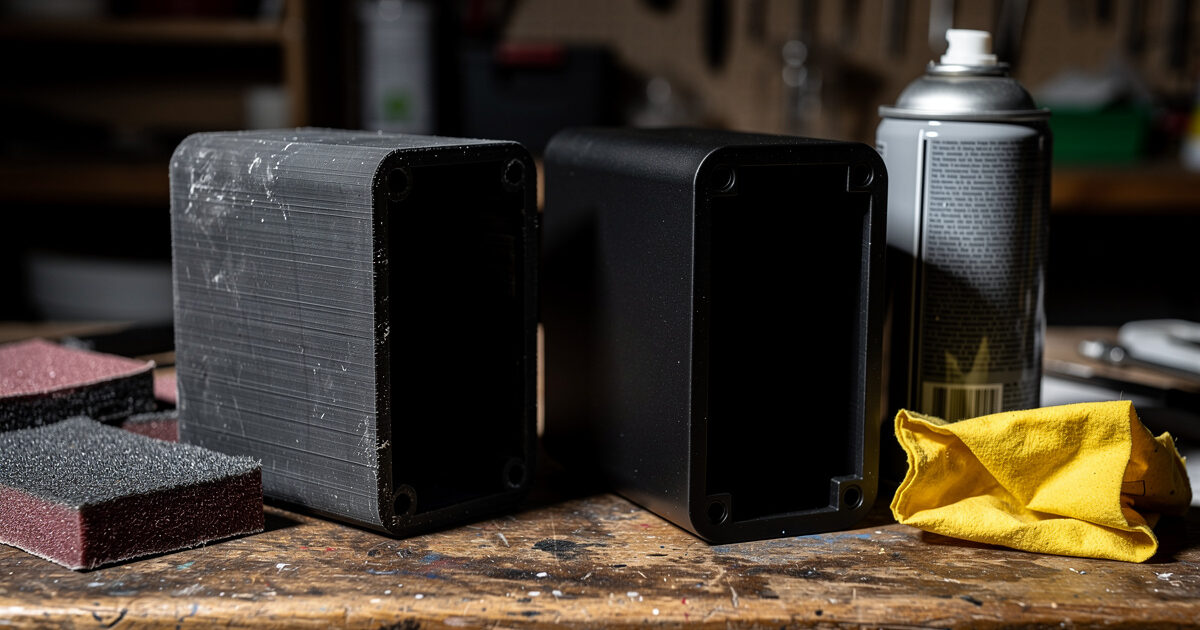
Stage 3: Filler primer (the layer-line killer)
Here’s the step most beginners skip and then wonder why their painted part still shows lines: filler primer. Standard primer is thin and just promotes paint adhesion. Filler primer (also sold as high-build or sandable primer) lays down a thick, sandable coat that fills the fine valleys sanding left behind. The workflow is to spray a coat, let it cure, sand it back, and repeat until the lines vanish. Two or three filler-primer-and-sand cycles will erase layer lines that no amount of dry sanding alone would touch.
This is the single highest-leverage cosmetic step on an FDM print, and it’s why I rarely sand past 400 before priming — the filler primer does the fine work. Standard rattle-can primer won’t do this; you specifically want a high-build, sandable formula — Rust-Oleum’s automotive filler primer is what I keep on the bench — applied in thin cured coats and knocked back between passes until the surface reads as one continuous plane under raking light.
Stage 4: Painting
With a properly primed and sanded surface, painting is the easy part — which is exactly why painting failures are almost always primer failures in disguise. The rules that matter are mundane: thin coats, not one heavy one; let each coat flash off before the next; keep the can moving and at a consistent distance. Rattle-can spray paint over filler primer gives results that genuinely look injection-molded if the prep underneath was honest.
The recurring theme across everything I’ve painted: the part that looks bad after paint almost never had a paint problem. It had a prep problem you can now finally see. So when a coat goes wrong — orange peel, runs, a gritty surface — resist the urge to fix it with more paint. Sand it back, find what the primer was hiding, and fix that instead.
Stage 5: Coating for strength or seal
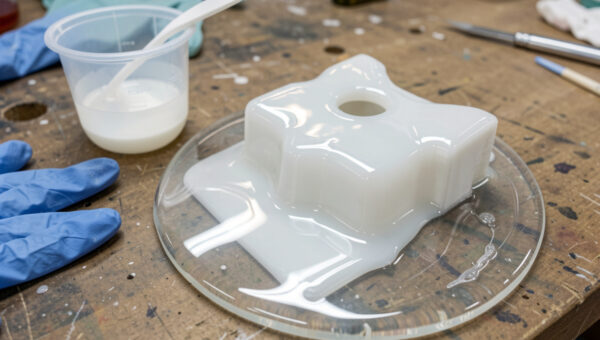
Painting is cosmetic. Coating is structural or protective, and it’s a different decision. Two coatings come up constantly on my bench:
Epoxy brings strength and a glass-smooth surface in one pass. A thin epoxy coat (the kind sold as a finishing or coating resin, not casting resin) self-levels over a printed part, fills layer lines, and meaningfully stiffens thin walls. It’s the move when a part needs to be both smooth and stronger than the print alone — a thin-walled enclosure that flexes too much, say, or a handle that takes load.
Clear coat is the protective top layer. It seals paint against handling wear, adds UV resistance for outdoor parts, and sets the final sheen from dead matte to high gloss. Skipping it is why painted parts get shiny finger-wear spots within a week of handling. UV-resistant clear coat is also the cheapest insurance for any part that lives outside — the same reason I print outdoor parts in ASA rather than ABS and then seal them.
The chemical shortcut: acetone smoothing
For ABS and ASA prints, there’s a path that sidesteps most of the sand-and-prime grind: acetone vapor smoothing. Acetone slightly dissolves the outer surface of those plastics, letting it re-flow and self-level so the layer lines blend into a glossy, almost-injection-molded skin. It’s genuinely impressive on the right material and genuinely useless on PLA, which acetone barely touches. It’s also the one finishing process I treat with real caution — acetone vapor is flammable and needs ventilation, the same ducted-exhaust setup I use for printing ABS in an enclosed machine.
If your part is ABS or ASA and you want smooth without hours of sanding, this is the route. For PLA and PETG, it’s not an option — those go down the sand-and-prime path. The material you chose at the slicer determines whether this shortcut is even on the table, which is one more reason material selection is a finishing decision, not just a strength decision.

Choosing a finishing path by goal
The mistake is treating finishing as one linear checklist. It’s really a branch based on what you want from the part. Here’s how I decide, with the trade-offs I actually weigh.
| Goal | Material | Path I take | Rough effort |
|---|---|---|---|
| Functional, hidden part | Any | Clean support removal, deburr, done | Minutes |
| Painted, matte finish | PLA / PETG | Sand to 220, filler primer, paint, matte clear | An evening |
| Glass-smooth gloss | PLA / PETG | Sand, filler primer cycles, wet-sand, paint, gloss clear | Multiple sessions |
| Smooth + stronger | Any | Light sand, thin epoxy coat, optional paint | A session + cure |
| Smooth, minimal sanding | ABS / ASA only | Acetone vapor smoothing, optional paint | A session + safety setup |
| Outdoor / UV exposed | ASA / PETG | Sand, primer, paint, UV-resistant clear coat | An evening |
Read that table as a fork, not a ladder. The acetone row and the sand-prime-paint rows are alternatives, not sequential. Pick the row that matches your part and its material, then follow that path. The amount of finishing also scales with the part — a small bracket and a large display piece take very different time budgets for the same goal, which is worth weighing back at the design stage.
The consumables that actually earn their place
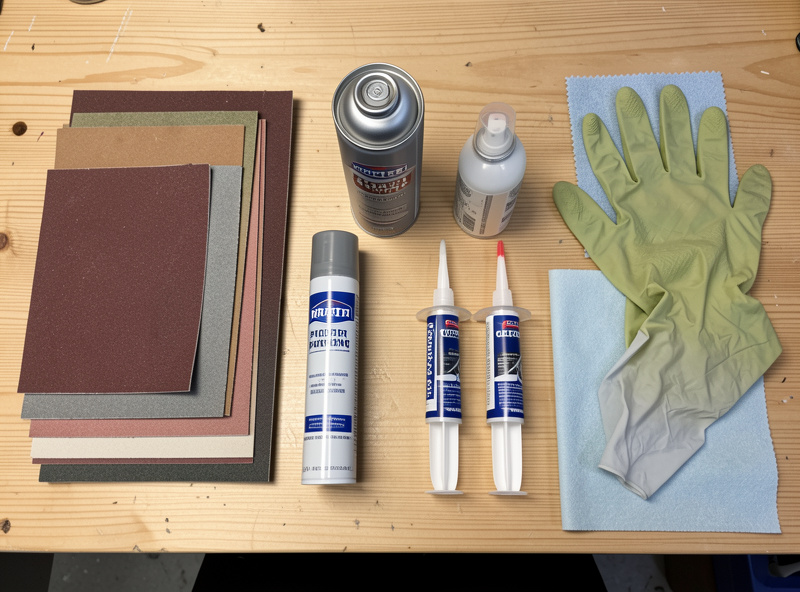
You can finish prints with a startlingly small kit, and most of the expensive gear sold for it is optional. After years of buying things that sat unused, here’s what genuinely stays on my finishing bench and what I’ve learned to skip.
Sandpaper in a real range of grits is non-negotiable — a kit spanning roughly 120 through 2000 covers everything from knocking down support scars to a pre-gloss polish. Buy wet/dry paper so the same sheets serve both jobs. A foam sanding block or a few sanding sponges keep flat surfaces flat; sanding a flat face with paper wrapped around your fingers is how you round edges you wanted crisp.
A can of high-build filler primer and a can of standard primer are different tools, and I keep both. The filler primer does the layer-line work; a thin standard primer is sometimes the better base coat directly under a finicky topcoat. Nitrile gloves and a pack of tack cloths sound trivial but change the result — a tack cloth pass before every primer and paint coat lifts the sanding dust that otherwise gets entombed in the finish as grit.
What I’d skip starting out: airbrush rigs, expensive named-brand “miniature” paints for anything bigger than a figurine, and dedicated smoothing machines. A rattle can and honest prep outperform a cheap airbrush in untrained hands, and the smoothing “stations” sold for ABS are a sealed container and a safe heat source you can assemble for a fraction of the price. Spend the money on more grits of sandpaper and better primer before anything with a motor.
One genuinely worthwhile upgrade once you’re finishing regularly: a respirator rated for organic vapors, not a dust mask. Spray primer, paint, clear coat, and acetone all put solvents into the air, and the cartridge respirator is the one piece of safety gear I will not finish without. It belongs on the consumables list because the cartridges are consumable — they have a service life and stop protecting you once saturated.
The finishing mistakes I see most often
Almost every disappointing finish I’ve been asked to diagnose comes down to one of a handful of repeat offenders. None of them are exotic; they’re the boring fundamentals, skipped under time pressure.
Rushing coats. The urge to lay down one thick coat of primer or paint to “save time” is the most common and the most destructive. Thick coats run, sag, take forever to cure properly underneath, and obscure detail. Thin coats, fully flashed off between passes, win every single time. Finishing rewards patience more than skill.
Sanding dust left on the surface. Primer and paint trap whatever was on the part when they went down. Skip the tack-cloth wipe and you’ll cure a fine grit of your own sanding dust into the finish, then wonder why a smooth-sanded part feels rough after primer. A two-second wipe prevents an hour of rework.
Skipping grits. Jumping from a coarse grit straight to a fine one feels efficient and isn’t — the fine paper just burnishes the deep scratches the coarse grit left, and they reappear under raking light after primer. Step through the grits. It’s faster than redoing the part.
Finishing a part that should have been redesigned. The deepest lesson is that some surface problems are cheaper to fix in CAD than on the bench. A face that needs to be smooth is often better printed flat against the bed or reoriented to avoid supports entirely, rather than sanded out afterward. Before committing an evening to finishing, ask whether a reprint with better orientation would have been the faster path. Often it would.
The order that actually matters
If you take one thing from this guide, take the sequence, because every finishing failure I’ve debugged traces back to a step done out of order or skipped:
- Remove supports cleanly — scars here cost you the most sanding later.
- Sand — coarse to fine, no skipped grits, wet-sand for gloss.
- Filler primer + sand back — the real layer-line killer, repeated until they vanish.
- Paint — thin coats over honest prep.
- Clear coat or epoxy — seal, protect, set the final sheen or add strength.
For ABS/ASA, acetone smoothing replaces most of steps 2 and 3. For functional parts, you stop after step 1. Everything else is choosing how far down the list a given part needs to go.
This finishing layer sits on top of a good print. If your parts are coming out rough in ways finishing can’t fix — stringing, poor layer adhesion, surface defects baked into the print itself — those are upstream problems. My notes on troubleshooting common print failures and the broader complete printing workflow cover the parts of this that live before the sandpaper. The PETG stringing fix in particular saves you from sanding off defects that should never have printed. Finishing makes a good print beautiful; it can’t make a bad print good.
Frequently asked questions
Do I have to sand a 3D print before painting it?
For a quality finish, yes. Paint sits on top of the surface it is given, so layer lines and support scars show straight through it. You do not always need to sand to a high grit though. Sanding to around 220 grit and then using a filler primer, which is sandable and fills the fine valleys, gets most parts to a clean painted finish without endless hand sanding. The filler primer does the fine work.
What is the difference between primer and filler primer?
Standard primer is a thin coat whose only job is to help paint stick. Filler primer, also called high-build or sandable primer, goes on thick and is meant to be sanded back. It fills the small valleys left by layer lines and sanding scratches. On an FDM print, filler primer is the single most effective step for hiding layer lines, which is why it is worth keeping separate from your paint primer.
Can I acetone-smooth a PLA print?
No. Acetone barely affects PLA, so vapor smoothing does not work on it. Acetone smoothing only works well on ABS and ASA, where the solvent re-flows the outer surface into a glossy skin. For PLA and PETG, the path to smooth is mechanical: sanding plus filler primer cycles, or a self-leveling epoxy coat.
Why does my painted print still show layer lines?
Because the lines were not filled before paint went on. Paint is too thin to hide layer lines on its own. The fix is to sand, then apply filler primer and sand it back, repeating until the lines disappear under the primer, and only then paint. A painted part that still shows lines almost always had a prep problem, not a paint problem.
When should I use epoxy coating instead of paint?
Use epoxy when you want strength and a glass-smooth surface, not just color. A thin coat of self-leveling finishing epoxy fills layer lines and stiffens thin walls in one pass, which paint cannot do. Use paint when the goal is purely cosmetic color. The two are not mutually exclusive: some parts get an epoxy coat for smoothness and strength, then paint and clear coat on top.
Is a clear coat actually necessary?
For a part that will be handled or live outdoors, yes. Clear coat seals paint against finger wear, so painted parts do not develop shiny worn spots within a week of handling, and a UV-resistant clear coat protects outdoor parts from sun fade and embrittlement. For a display piece that never gets touched, you can skip it, but it is cheap insurance for anything that gets used.