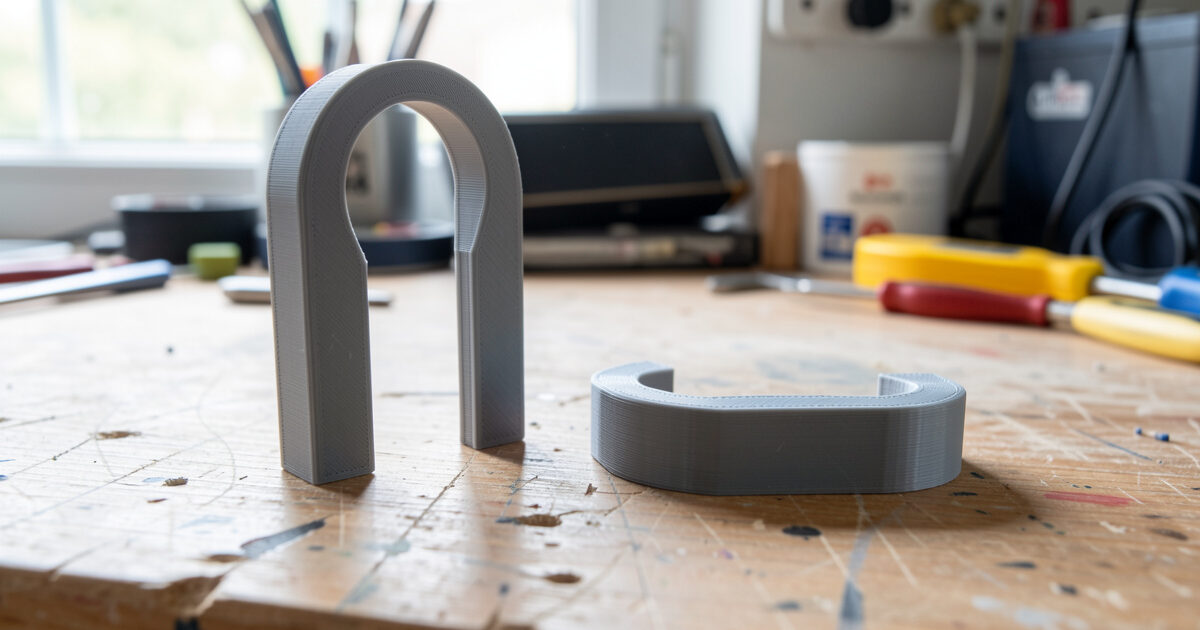
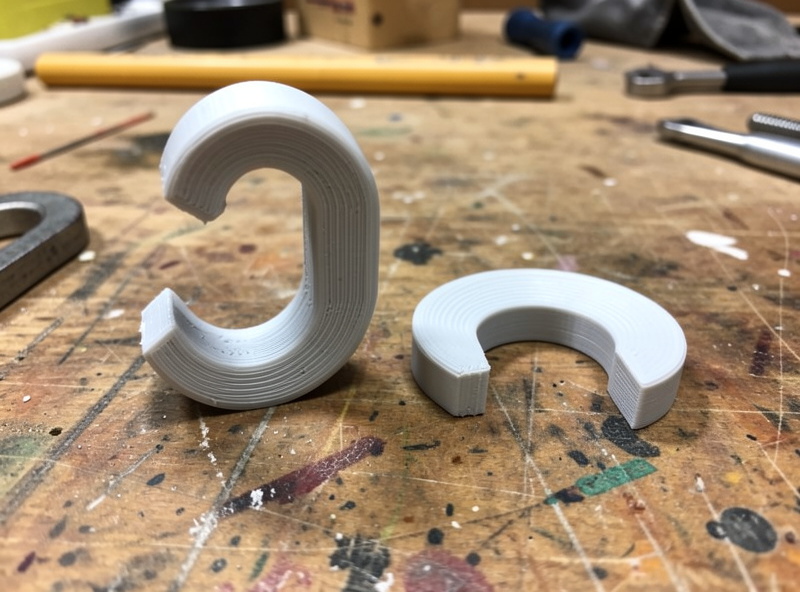
The strongest 3D print comes from getting two things right before you ever touch infill density: print orientation and wall count. For a part that has to resist breaking, the single most effective move in strongest infill 3D printing is orienting the model so the load runs within the layers, not across them — that alone can make a part three to five times stronger than the identical model printed the wrong way up.
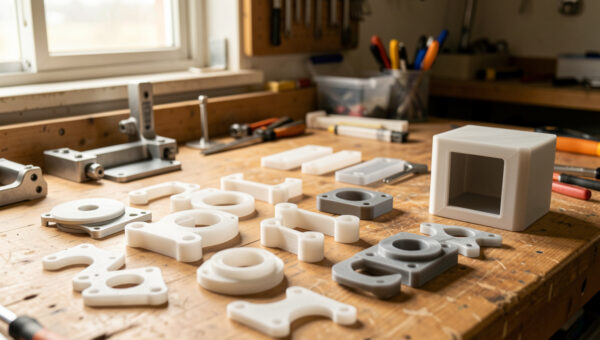
Infill pattern and percentage get all the attention because they are easy sliders to drag. But across the machines I run — my Prusa MK4S daily driver, the Bambu A1 and P1S, the Creality K1C — I have pulled enough test parts to be blunt about it: orientation and perimeters decide whether a part survives, and infill is the fine-tuning on top. This guide puts those levers in the order that actually matters and tells you which infill pattern to pick once the big decisions are made.
Why Orientation Beats Everything Else
FDM parts are anisotropic. Within a layer, plastic is laid down as one continuous extrusion and is genuinely strong. Between layers, the bond depends on the previous layer being remelted by the next — a weaker, partial weld. Pull a part along that weld line and it peels apart at a fraction of its in-plane strength. That is why a hook printed standing up snaps almost immediately while the same hook printed lying flat holds. Protolabs Network’s FDM design guidelines document this layer anisotropy and how orientation drives part strength.
The rule I work to is simple: identify the main load direction, then orient the part so that load runs across solid extrusions rather than across the layer stack. A bracket arm goes flat to the bed. A hook lies down so its curve is in the build plane. A threaded boss that gets pulled goes so the pull is in-plane. Sometimes the strong orientation costs you supports or a rougher visible face — for a functional part, take the trade every time. This is the first decision in the whole functional 3D printing workflow, and it is free.
Walls Carry the Load, Not Infill
Once orientation is set, perimeters are the next lever. Walls are continuous loops of plastic wrapping the shell, and they carry bending and torsion far better than the lattice inside. For a structural part I run four to six perimeters before I touch infill density. On my bench, going from two walls to four does more for stiffness than jumping infill from 20% to 40% — and it uses less filament and prints faster.
The reason is geometry. A beam resists bending with material at its outer surface, which is exactly where walls live. Infill sits near the neutral axis where it does little for bending. So the efficient path to strength is thick walls plus modest infill, not thin walls plus dense infill. For thin parts — clips, mounts, brackets — the part can be almost all perimeters with 15% infill and still beat a thin-walled, high-infill version. I unpack the design side of this in the guide to designing for strength.
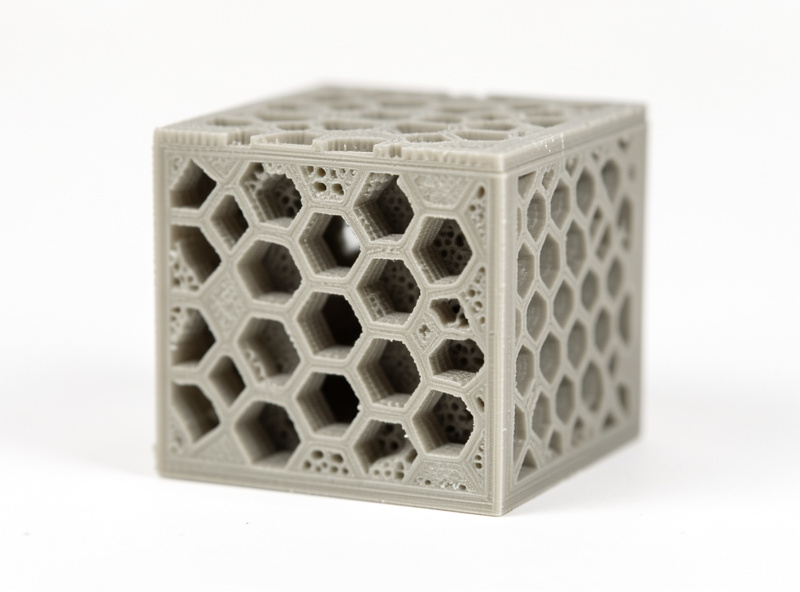
Which Infill Pattern Is Actually Strongest
With orientation and walls handled, the pattern question finally matters — and the honest answer is that it matters less than people think at the same density. For general functional parts, gyroid is my default: it is strong in every direction, prints fast, and does not trap as much heat as dense rectilinear. For maximum compressive and shear strength, cubic and the honeycomb-style patterns edge ahead. Concentric is for flexible parts where you want the infill to bend with the walls.
The pattern that wins depends on the load. Here is how the common patterns compare for functional work, based on how they behave on my machines rather than marketing claims.
| Pattern | Strength profile | Print speed | Best for |
|---|---|---|---|
| Gyroid | Strong, isotropic | Fast | General functional default |
| Cubic | Strong in 3 axes | Medium | Multi-direction loads |
| Honeycomb / Hexagonal | High shear strength | Slow | Compression, top support |
| Grid / Rectilinear | Stiff, anisotropic | Fast | Quick parts, less critical |
| Concentric | Flexible with walls | Fast | TPU and flex parts |
For a deeper breakdown of every pattern with the speed and filament-use trade-offs, my dedicated infill patterns guide goes pattern by pattern. The short version: pick gyroid unless you have a specific reason not to, and spend your effort on walls and density instead. Protolabs Network’s guide to selecting shell and infill parameters backs up the walls-over-infill priority with the same reasoning.
How Much Infill Density Do You Actually Need?
Density is where most filament gets wasted. The strength-to-density curve flattens hard above about 50% — going from 50% to 100% roughly doubles print time and plastic for a modest strength gain, because by then the walls and the infill are already doing most of the work. For everyday functional parts I run 25%. For parts under real compression or impact I go to 40–50%. Solid 100% infill is reserved for small parts where the geometry is the strength, like a thin spacer or a tool.
The trap is reaching for high infill to fix a part that is actually failing from bad orientation or thin walls. I have watched people push a part to 80% infill chasing strength when the real problem was that it was printed standing up. Fix orientation and walls first; only then does adding density buy you anything. Thinner layers help too — they bond more completely — so dropping to 0.15 mm on a critical part adds strength the same way more walls do. My layer height comparison shows the trade against print time.
Material Still Sets the Ceiling
No infill pattern rescues the wrong material. PLA is stiff but brittle and creeps under sustained load. PETG is my functional default — tough, good layer adhesion, forgiving. For impact and heat, ABS and ASA pull ahead, and carbon-fibre blends add stiffness for parts that must not flex at all. Crucially, layer adhesion — the thing orientation depends on — is partly a material and temperature story: printing near the top of a material’s temperature range fuses layers more completely and narrows the gap between in-plane and Z strength.
Wet filament quietly wrecks all of this. Moisture in the spool degrades layer bonding, so a part that should be strong comes out brittle and snaps at the layer line regardless of your settings. Dry the spool. For the full material picture see my filament guide, and for stiff parts the carbon fibre filament guide. Flexible parts follow different rules entirely — the TPU settings profile covers those.
A Quick Test to Find the Strong Orientation
When a part is awkward and the load path is not obvious, I run a thirty-second mental test before slicing: imagine the part in your hands and picture how it would break under the real-world abuse it will see. The crack you imagine is almost always a layer line peeling apart. Rotate the model so that imagined crack runs across solid extrusions instead, and you have found the strong orientation. It sounds informal, but it matches what the tensile pulls in my logs show every time.
For genuinely critical parts I will print a small test coupon in the candidate orientation and try to snap it by hand before committing to a multi-hour print. It costs a few grams of filament and ten minutes, and it has saved me from printing a beautiful bracket that would have failed on the first load. If the strong orientation needs supports, that is fine — clean support removal is a solved problem, and I cover it in the support removal guide. A part that needs a little cleanup but survives beats a clean part that snaps.
The Strength Stack, In Order
Put together, the priority order for a strong part is: orient for the load, then run four to six walls, then pick gyroid (or honeycomb for compression), then set 25–50% density to suit, then choose a material that matches the environment and print it dry and hot enough to bond. Work top to bottom and stop when the part is strong enough — there is no prize for a 100%-infill part that was going to survive at 30%.
That order is also the cheapest. The two biggest levers — orientation and walls — cost little or no extra plastic, while the lever everyone reaches for first — cranking density — is the most expensive and the least effective. Get the free wins first. A reliable, well-calibrated machine makes all of it repeatable; my Prusa MK4S review explains why I use it as the benchmark for parts that have to hold.
Frequently Asked Questions
What is the strongest infill pattern for 3D printing?
Gyroid is the best all-round choice: strong in every direction, fast, and efficient. For pure compression or shear strength, honeycomb and cubic patterns edge ahead. At the same density the difference between good patterns is smaller than the difference orientation and wall count make.
Is higher infill always stronger?
Up to a point. Strength gains flatten above about 50 percent density, so going from 50 to 100 percent roughly doubles time and filament for a modest gain. Increasing wall count is usually a more efficient way to add strength than chasing high infill.
How does orientation affect 3D print strength?
Hugely. FDM parts are weak between layers, so a load pulling across the layer stack can fail at a fraction of the in-plane strength. Orienting the part so the main load runs within the layers can make it three to five times stronger with no extra material.
How many walls should I use for strong parts?
Four to six perimeters for structural parts. Walls carry bending and torsion far better than infill because they sit at the outer surface where it counts. On most parts adding two walls does more for strength than doubling infill density.
Does infill percentage matter more than pattern?
Yes, within reason. Density has a bigger effect than pattern choice for most loads, but both are secondary to orientation and walls. Pick gyroid, set 25 to 50 percent density to suit the load, and spend your effort on getting the orientation and perimeters right first.
Why does my strong-looking part still break easily?
Usually wrong orientation, too few walls, or wet filament. A part with high infill can still snap at the layer line if it is printed in the weak direction or the spool absorbed moisture. Fix orientation and walls and dry the filament before adding density.