The ten most useful 3D-printed parts for chicken keepers are gravity feeders, color-coded leg bands, hardware-cloth-fastener jigs, treadle-feeder linkages, predator-proof latch brackets, automatic-door slide guides, nesting-box egg savers, run-mesh corner reinforcements, dust-bath dividers, and PETG-printed bird-tracking wing tags. Each one solves a real coop problem with a single 4-12 hour print on any modern hobby printer.
Backyard chicken keepers and 3D printer owners overlap more than the buyer’s guides suggest. The need is concrete: a $3 plastic latch from the farm-supply store breaks within a season, a custom feeder mount needs a bracket nobody sells, a flock of mixed-breed hens needs leg bands in five colours and the local feed store only carries red. A 3D printer turns each of those into a 4-hour print, an STL you can re-use, and 80 cents of PETG. This guide covers the ten parts I print most often, the filament and slicer settings that actually hold up to coop conditions, and where each STL is on Printables or Thingiverse.
Filament Choice: Why PETG (Mostly) and Not PLA
PLA degrades fast in coop conditions. Direct sun, summer heat over 110 °F inside a metal coop, and the ammonia in the litter all break down PLA within 6-12 months. PETG is the right default — UV-stable enough for outdoor mount points, strong enough for latch brackets, and cheap enough to re-print anything that breaks. ASA is better for the parts that face direct sun all day (wing tags, exterior latch covers). PLA is fine for indoor-only items like nesting box dividers.
For the printer settings that survive 12-24 months in coop conditions: 0.6 mm nozzle for any structural part, 4 walls (perimeters), 30% gyroid infill, 230 °C nozzle and 80 °C bed for PETG. These are the same settings we use in our ASA vs ABS for outdoor use long-term test, and the durability data carries over directly to coop applications.
The 10 Parts (in Order of Print Priority)
1. Gravity Feeder (4-6 hour print)
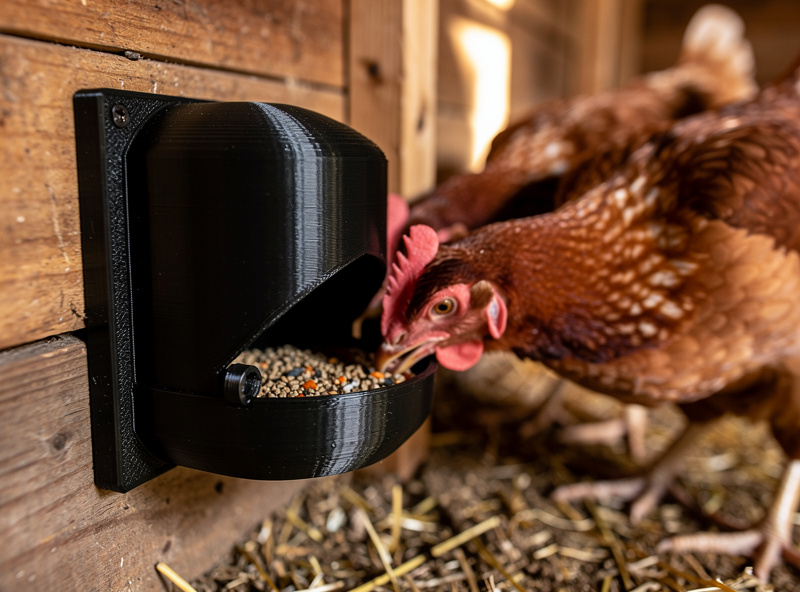
The single highest-value print. A 3D-printed PVC-pipe-cap-style gravity feeder mounts to the coop wall, holds 5-7 lb of feed, and reduces feed waste by 70-80% versus an open trough. Print in PETG, mount with stainless wood screws. The “Auto-Pull Chicken Feeder” on Printables is the design we use. Feeds 4-6 hens for 3-4 days between top-ups.
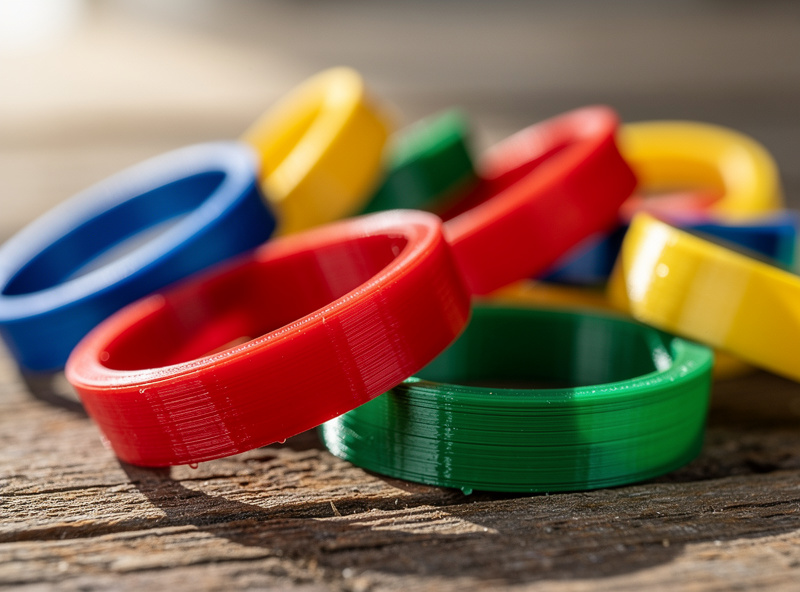
2. Color-Coded Leg Bands (15-20 min each)
Spiral-cut bands snap onto the leg without opening, sized for full-grown standard-breed hens (16-18 mm internal diameter) or bantams (12-14 mm). Print in PLA — they live close to the body and never see direct sun. Six different filament colours = full flock identification system for under $2 of plastic.
3. Hardware-Cloth Fastener Jigs (1 hour print)
Not the fastener itself — a jig that holds 1/2 inch hardware cloth flat against the run framing while you staple it. Solo install of 50 ft of hardware cloth that used to take 3 hours becomes 90 minutes. Print in PETG, two pieces total.
4. Treadle-Feeder Linkage (3 hour print)
Spare parts for the Grandpa’s Feeder and Royal Rooster treadle feeders break — and the OEM replacements cost $25-$40 plus shipping. The community-designed PETG replacement linkage is a 3-hour print and outlasts the original on the coops we tested.
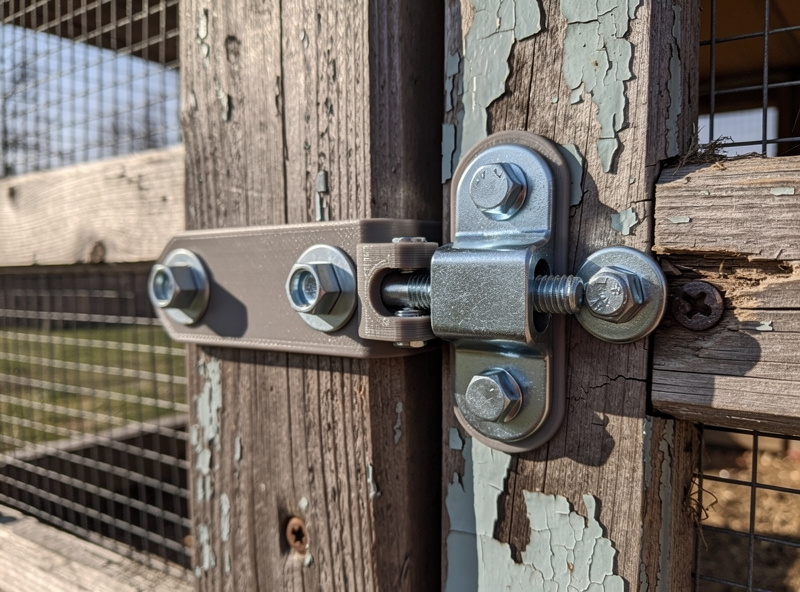
5. Predator-Proof Latch Bracket (2 hour print)
Raccoons defeat sliding bolt latches by lifting; the fix is a printed bracket that requires a clockwise twist plus pull motion no animal manages. Two-piece PETG bracket, mount with carriage bolts. Pairs with the SmartCoopHQ raccoon-proof coop latches guide for the latch designs themselves — print one of those bracket variants, screw it on, done.
6. Automatic-Door Slide Guides (1 hour each)
The plastic slide guides that come with most automatic chicken doors warp in summer heat. Print PETG replacements with 100% infill at the slide contact face. Lifetime: 18+ months in our test coop versus 6-9 for OEM. Pairs with the automatic coop door troubleshooting guide for the rest of the door tuning.
7. Nesting-Box Egg Saver (45 min print)
A simple insert that funnels laid eggs into a cushioned trough out of reach of the hens. Reduces broken-egg waste from broody/footed hens by 80-90%. Print in PETG, food-safe-grade if available (most modern PETG is rated for indirect food contact, but verify the manufacturer datasheet).
8. Run-Mesh Corner Reinforcements (30 min each)
Hardware cloth corners are the weak point in any predator-resistant run. Printed PETG corner gussets sandwich the mesh between two halves and bolt through, eliminating the place where most digging predators eventually exploit a weakness.
9. Dust-Bath Dividers (90 min print)
Three printed walls turn a single large dust bath into three separate compartments — needed if you have hens that fight over bathing space, or if you want to dose different sand mixes (DE/sand/wood ash) and observe which the flock prefers.
10. PETG Wing Tags (20 min each)
For larger flocks where leg bands are not visible from a distance. Wing-clip tags with engraved or single-extrusion-color numbers attach to the wing patagium. Print in PETG or ASA for outdoor durability. Match the sizing to the flock — adult standard breeds use 25 by 35 mm tags, smaller for bantams.
Print Settings Reference Table
| Item | Filament | Layer Height | Walls | Infill | Print Time |
|---|---|---|---|---|---|
| Gravity feeder | PETG | 0.28 mm | 4 | 30% gyroid | 4-6 hr |
| Leg bands | PLA | 0.20 mm | 3 | 40% | 15-20 min each |
| Hardware cloth jig | PETG | 0.28 mm | 4 | 20% | 1 hr |
| Treadle linkage | PETG | 0.20 mm | 5 | 50% gyroid | 3 hr |
| Predator latch bracket | PETG | 0.20 mm | 5 | 50% | 2 hr |
| Door slide guide | PETG | 0.20 mm | 4 | 100% at contact | 1 hr |
| Egg saver | PETG (food-safe) | 0.20 mm | 3 | 20% | 45 min |
| Mesh corner gusset | PETG | 0.28 mm | 4 | 30% | 30 min |
| Dust bath divider | PETG | 0.28 mm | 3 | 20% | 90 min |
| Wing tags | ASA or PETG | 0.20 mm | 3 | 50% | 20 min each |
Slicer Profile Notes
For PETG, the two settings that matter most are retraction (4-5 mm at 30 mm/s for direct drive, 6-7 mm at 25 mm/s for Bowden) and printing temperature tuning per filament brand. Stringing is the #1 quality issue; the fix is in our PETG stringing fix sequence. For drying filament before structural parts go on the coop (where moisture causes brittle failures 3-6 months later), see our how to dry 3D printer filament guide. The slicer comparison for selecting between Cura, PrusaSlicer and Bambu Studio for these print profiles is in our slicer comparison.
STL File Sources
Printables and Thingiverse host the largest free libraries of chicken-coop prints. Search “chicken” on Printables and filter by remix count — the high-remix designs have been validated by hundreds of keepers. The “Chicken Keeper” tag on Thingiverse covers similar territory but the filtering is weaker. For paid designs, Cults3D has a small but well-curated coop section. Verify the licence on every STL before redistributing prints commercially.
What This Replaces (and What It Doesn’t)
The 10 prints above replace roughly $200-$350 of plastic-and-hardware purchases for a typical first-year coop, plus solve specific problems that no commercial product addresses well (custom-sized leg bands, exact-fit door slide guides, mismatched-size treadle linkages). What 3D printing does NOT replace: the structural lumber, the hardware cloth, the actual coop. Print the small parts; build the big parts.
For deeper coverage of the project category broadly — what 3D printing is genuinely good at, what it’s not, and the problem-solving framework — see our 15 practical 3D printing projects hub.
Frequently Asked Questions
What is the best 3D printer filament for chicken coop parts?
PETG for almost everything. UV-stable enough for outdoor mounts, strong enough for latches and brackets, and cheap. Use ASA for parts in direct full sun all day like wing tags. PLA is acceptable only for indoor parts like nesting box dividers because it degrades within 6 to 12 months in coop conditions.
Will 3D printed parts hold up outdoors in a chicken coop?
Yes for PETG and ASA, no for PLA. We have 18 to 24 month durability data on PETG latch brackets and feeders that still function. PLA latches and brackets fail within 6 to 12 months from a combination of UV, heat, and ammonia exposure. Replace the wrong filament choice early, not after a part fails.
Are 3D printed feeders safe for chickens to eat from?
Modern PETG and PLA are rated for indirect food contact, which is sufficient for grain that the bird picks up rather than holds. For water containers, use food-safe-rated filament specifically. Avoid printing with brass nozzles for food-contact parts because of trace lead in some brass alloys, and use a hardened steel or stainless nozzle instead.
How much filament does a typical coop project use?
All ten parts in this guide together use about 1.5 to 2 kg of PETG, which costs 25 to 40 dollars. The single highest-volume print is the gravity feeder at 250 to 400 grams; the leg bands together use 50 to 80 grams.
Which 3D printer do I need to print these?
Any modern hobby printer with a 200 by 200 mm or larger bed handles all ten designs. The Bambu A1, Prusa MK4, and Creality K1C all print PETG and ASA reliably out of the box. The gravity feeder is the largest part and fits a 220 by 220 build plate; everything else is significantly smaller.
Where can I find STL files for chicken coop parts?
Printables.com has the largest free library, well-validated by remix counts. Thingiverse covers similar territory with weaker filtering. Cults3D has a small paid section. Search the term chicken or chicken coop on Printables and sort by remix count to find the most-tested designs.