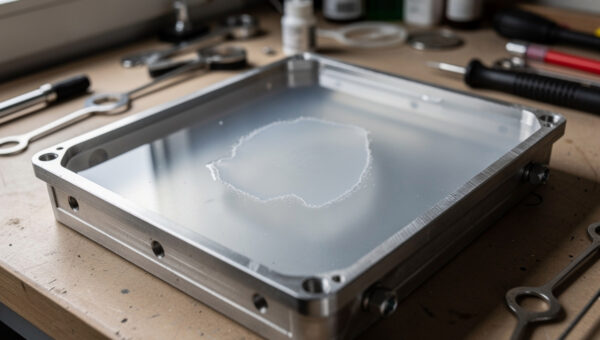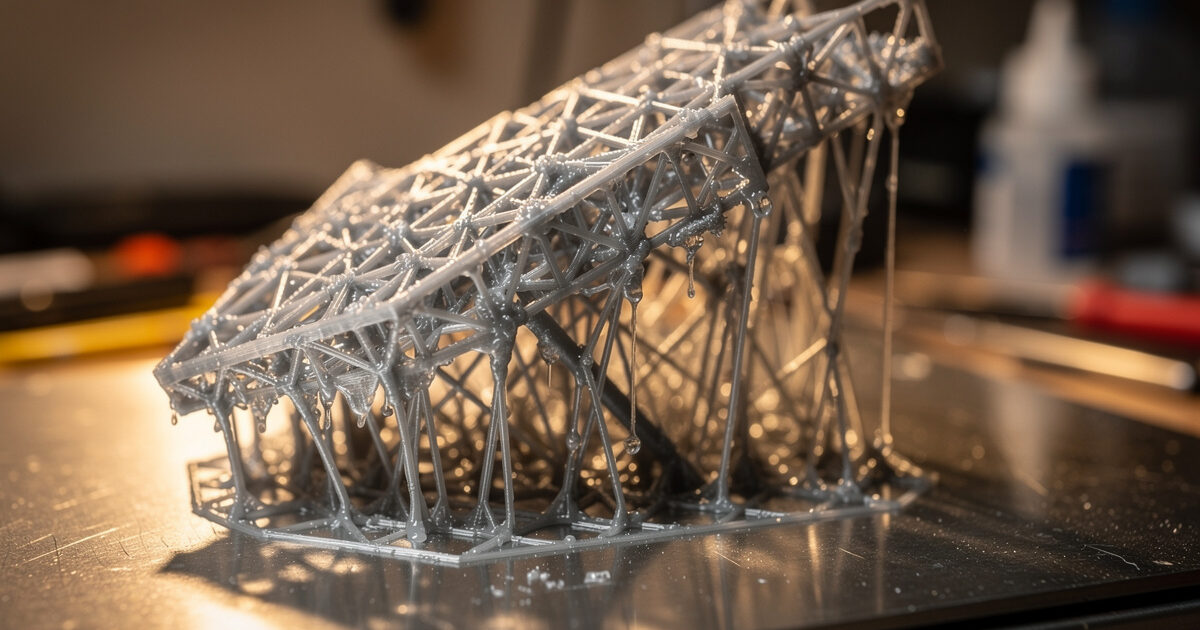
Resin supports work differently from FDM supports, and the difference is what trips up converts. In FDM, supports fight gravity while the part prints. In resin, every layer is fully supported by the cured layer above it as the build plate lifts, so resin supports exist to manage peel force and to anchor overhangs and islands that would otherwise float away in the vat. Get them wrong and you find a tangle of half-cured spaghetti stuck to the FEP instead of a model.
I came to resin from an FDM-first bench, where I’ve spent years sorting out tree versus normal supports and dialling in custom support placement in the slicer. The mental model transfers, but the physics don’t — resin supporting is about suction and islands, not bridging gravity. What follows is how I think about orientation and supports for resin, cross-checked against what experienced resin operators report. It pairs with the wider workflow in the complete resin printing guide.
Why Resin Needs Supports at All
Two problems drive resin supports: islands and peel force. An island is any part of a layer that has no cured material beneath it — a floating element that would simply detach and drift in the resin if nothing anchored it. Supports give those islands something to grow from. Peel force is the suction created each time the plate lifts a freshly cured layer off the film, and supports (plus smart orientation) spread and reduce that force so a delicate part isn’t torn off the plate.
This is why a model that prints fine flat on an FDM bed often needs careful supporting in resin. The slicer flags islands automatically, but it can’t judge cosmetics or peel strategy — that’s the operator’s job. Understanding that supports anchor islands and manage suction, rather than hold up overhangs against gravity, is the insight that makes the rest of support work make sense.
Orientation Comes First
Orientation matters as much as the supports themselves, and you decide it before you place a single support. Tilting a model — often 30 to 45 degrees off flat — reduces the cross-sectional area that peels off the film at any one layer, which lowers suction, protects the FEP, and reduces the chance of a layer tearing. It also lets you angle support marks onto non-cosmetic faces and away from the surfaces you care about.
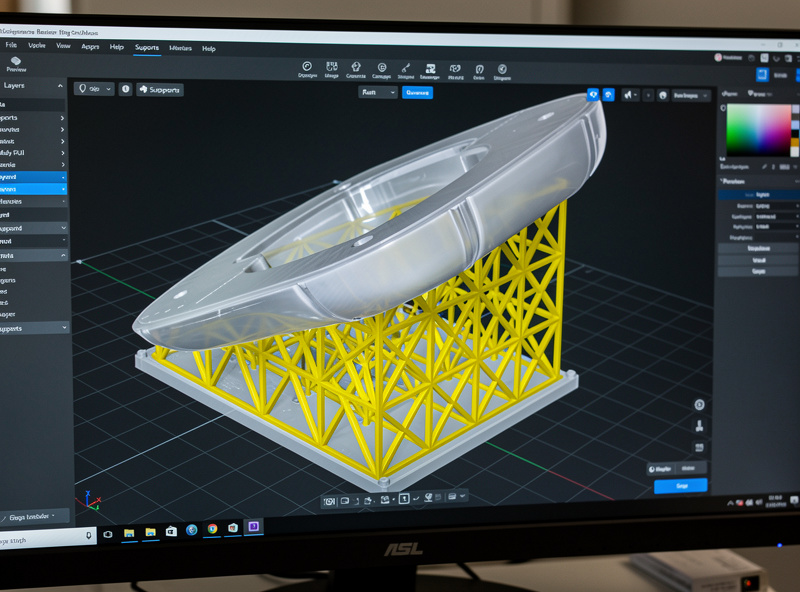
Avoid printing large flat surfaces parallel to the plate — that’s the worst case for suction and the classic cause of prints ripping off the FEP. Tilting also drains trapped resin better and avoids “cupping,” where a hollowed model traps a pocket of resin that creates enormous suction (the fix being a tilt plus drain holes). Spend your time on orientation first; good orientation means fewer supports, less suction, and cleaner cosmetic faces, and it’s the lever beginners most often ignore.
Light, Medium, and Heavy Supports
Resin slicers offer light, medium, and heavy support presets, and choosing between them is a trade-off between security and cleanup. Heavy supports hold a part more firmly and reduce failure risk, but leave more marks and are harder to remove. Light supports leave cleaner surfaces but risk a part detaching mid-print. Medium is the sensible default, with manual additions where the slicer’s automatic placement misses an island or under-supports a heavy section.
The detail that decides cleanup quality is the contact-point (tip) diameter — the size of the support where it touches the model. A smaller tip leaves a cleaner, smaller nub that’s easier to sand, but holds less securely; a larger tip is stronger but leaves a crater. The skill is using small tips on cosmetic faces and larger, denser supports on the heavy structural areas and the leading edges that take the most peel force. Always add manual supports to islands the slicer flags but under-supports, and to the lowest points where the print begins.
Removing Supports Cleanly
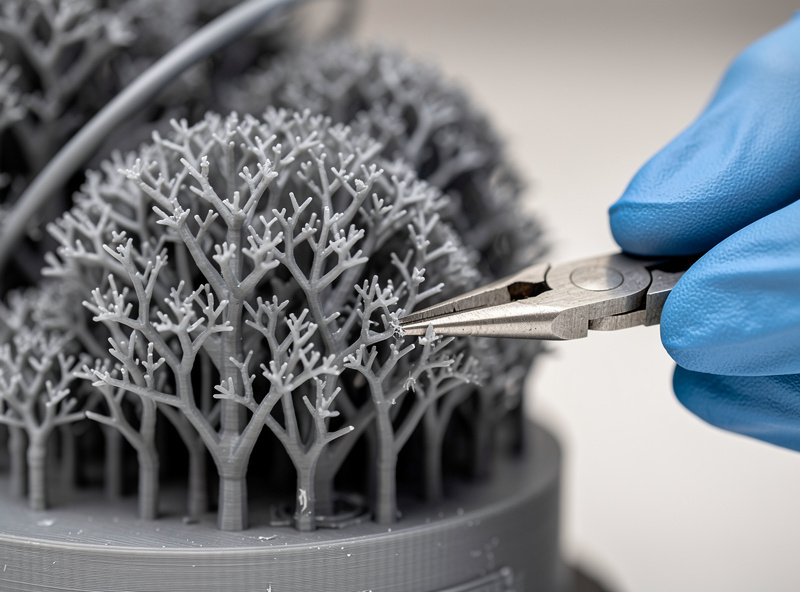
When you remove supports changes how cleanly they come off. On brittle standard resins, removing supports while the part is washed but only lightly cured — before the final full cure — lets them snap off cleaner with less risk of cracking the model, because fully cured resin is harder and more brittle. Some operators prefer to de-support before any curing at all. It’s worth testing both on your resin and part.
Pull supports by hand where you can, and use flush cutters for the stubborn ones rather than tearing chunks out of the surface. Any nub left behind sands smooth once the part is fully cured. A pair of flush cutters and a little patience handle the worst of it. Always wear gloves until the part is fully cured — uncured support stubs carry the same sensitiser risk as any uncured resin, which is why the safety routine runs right through post-processing.
Auto Supports vs. Manual Control
Every resin slicer — Lychee, Chitubox, and the rest — offers automatic support generation, and it’s a genuinely good starting point, but treating it as the finished job is where prints fail. The auto-generator places supports under flagged islands and overhangs using your light/medium/heavy preset, and it gets the bulk of a simple model right. What it can’t do is weigh cosmetics, anticipate suction on a large flat face, or judge that a particular delicate spire needs a custom support the algorithm skipped.
The workflow I trust is auto-generate first, then audit manually: rotate the model, check every island warning, add supports to anything the algorithm under-supported, thicken supports on leading edges and heavy masses, and thin or move supports off cosmetic faces. Most slicers let you edit individual supports — change a tip diameter, delete a redundant one, or add a manual pillar to a weak spot. That manual pass is the difference between a print that succeeds and one that nearly does. The auto-supports are a draft, not a decision, and the few minutes of manual review pay for themselves the first time they catch an unsupported island before it becomes spaghetti on the FEP.
Supporting Different Kinds of Models
How you support depends heavily on what you’re printing, and the two big categories pull in opposite directions. Highly detailed cosmetic models — miniatures, busts, display pieces — want minimal marks on visible faces, so you tilt aggressively, use the smallest contact tips that still hold, and accept more manual support work to protect the finish. The whole game here is hiding support scars on the underside and back.
Functional or mechanical parts care less about cosmetics and more about not failing mid-print, so you can lean on medium-to-heavy supports and larger tips for security, then clean up afterward. Hollow models add their own rule: hollowing saves resin and reduces suction, but a sealed hollow traps resin that creates massive suction and can implode the shell, so it always needs drain holes placed at the lowest points in the print orientation. Flat-bottomed parts that genuinely need a flat face can be printed directly on the plate with a raft and heavy base exposure instead of supports, accepting some elephant-foot on the first layers. Match the strategy to the part rather than applying one support recipe to everything.
Common Support Mistakes
A handful of mistakes account for most support failures, and they’re easy to avoid once named. Under-supporting islands is the classic — the slicer flags a floating element, you trust the auto-supports, and that one unsupported island detaches and ruins the print or sticks to the FEP. Always review the island warnings manually. Printing flat surfaces parallel to the plate is the second: it maximises suction and tears parts off, and the fix is simply to tilt.
Other frequent errors include too-large contact tips on cosmetic faces (craters that are a nightmare to sand), too few supports on the leading edges that take the most peel force, and forgetting drain holes on hollowed models. Over-supporting is its own trap — burying a model in heavy supports wastes resin, adds hours of cleanup, and pocks the surface without improving reliability where it matters. The goal is enough support exactly where the physics demand it, and no more. Reviewing the sliced model layer by layer before printing catches almost all of these in a couple of minutes.
A Repeatable Support Workflow
The sequence I follow keeps supporting reliable: orient the model first to minimise suction and hide marks, let the slicer auto-generate medium supports, then manually fix every flagged island and reinforce the leading edges and heavy sections, using small tips on cosmetic faces. Hollow large solid models and add drain holes to kill cupping suction. After printing, wash, remove supports at the cure stage that snaps cleanest for your resin, then fully cure and sand the nubs.
Supporting well is the resin skill that most rewards practice, because the feedback loop is fast — a failed support strategy shows up as a clearly visible failure you can learn from. Treat orientation as the first and most important decision, supports as the second, and removal timing as the finishing touch, and your success rate climbs quickly. For everything around this step, the main resin guide connects supports to exposure, wash-and-cure, and the rest of the process.