Almost every 3D print quality problem traces back to one of four systems: extrusion, adhesion, motion, or temperature. Once you learn to read a failed print like a fault code, you stop guessing at settings and start fixing the actual cause — usually in one or two iterations instead of ten.
I run a bench of current machines side by side — a kit-built Prusa MK4S as my reliability benchmark, plus a Bambu A1 and P1S, a Creality K1C, and an Anycubic Kobra 3 — and the parts coming off them are functional: hydroponic reservoir lids, sensor mounts, welder shop fixtures, leather edge slickers. When a part fails, I do not need it to look pretty; I need it to fit and hold. That changes how you diagnose. This guide is the symptom-first map I actually use: find your defect, understand the system behind it, then jump to the focused fix.
Read the Print First, Then Touch the Slicer
The fastest way to waste filament is to change five settings at once because a forum thread told you to. The disciplined method is the opposite: pick the print up, find the single most prominent defect, and identify which of the four systems it belongs to. A quality problem is a symptom, and symptoms point at causes.
Hairy wisps between towers? That is an extrusion-and-temperature problem (oozing). A corner lifting off the bed? Adhesion and thermal contraction. The whole top of the model sheared sideways? Motion — a belt or a missed step. Walls that look fine but feel weak and split along a layer? Layer adhesion, which is extrusion plus temperature again. Each family has its own diagnostic tells, and chasing the wrong family is how people end up convinced their printer is broken when one setting was off. For a second opinion on reading symptoms, Simplify3D’s print-quality guide and the RepRap pictorial troubleshooting guide both map the same defects back to their causes.
My rule on the bench: one change per print, and write it down. I keep a running test log for each machine — what I changed, what it did. It feels slow for the first week and then it is the single biggest reason my failure rate dropped. You cannot tell which variable fixed a print if you moved three of them.
The Defect-to-Cause Map
This is the table I wish someone had handed me when I started. It pairs the visible symptom with the system most likely responsible and the first lever to pull. Treat the “first fix” column as where to start the focused guide, not the whole answer — each defect has a full diagnostic sequence linked further down.
| Visible Symptom | System | Most Likely Cause | First Fix to Try |
|---|---|---|---|
| Hairy strings between parts | Extrusion + heat | Too much pressure / too hot | Lower temp 5°C, tune retraction |
| Corner or edge lifting | Adhesion + thermal | Contraction beats bed grip | Clean bed, add brim, control drafts |
| Bulging bottom edge | First layer | Nozzle too low / bed too hot | Raise Z offset, drop bed temp |
| Top shifted sideways | Motion | Loose belt / skipped step | Tension belts, slow down, check pulleys |
| Gaps, thin or missing lines | Extrusion | Partial clog / low flow | Clean nozzle, check flow + temp |
| Echo lines after sharp corners | Motion + speed | Frame vibration / no input shaping | Calibrate input shaping, lower accel |
| Walls split along a layer | Layer adhesion | Too cold / too fast / wet filament | Raise temp, slow down, dry filament |
Notice how many rows resolve to temperature and extrusion. That is not a coincidence: most quality complaints are a flow or thermal issue wearing a costume. Get those two dialed and the defect list shrinks dramatically.
Surface-Quality Defects: Stringing and Ghosting
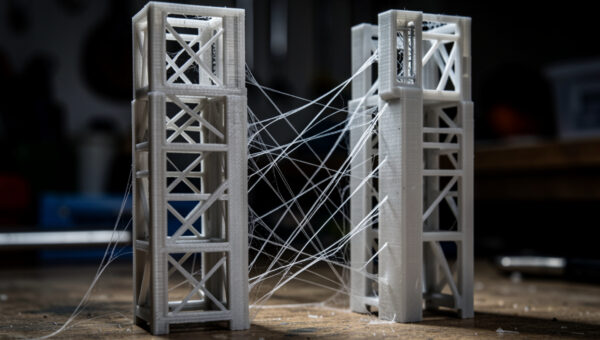
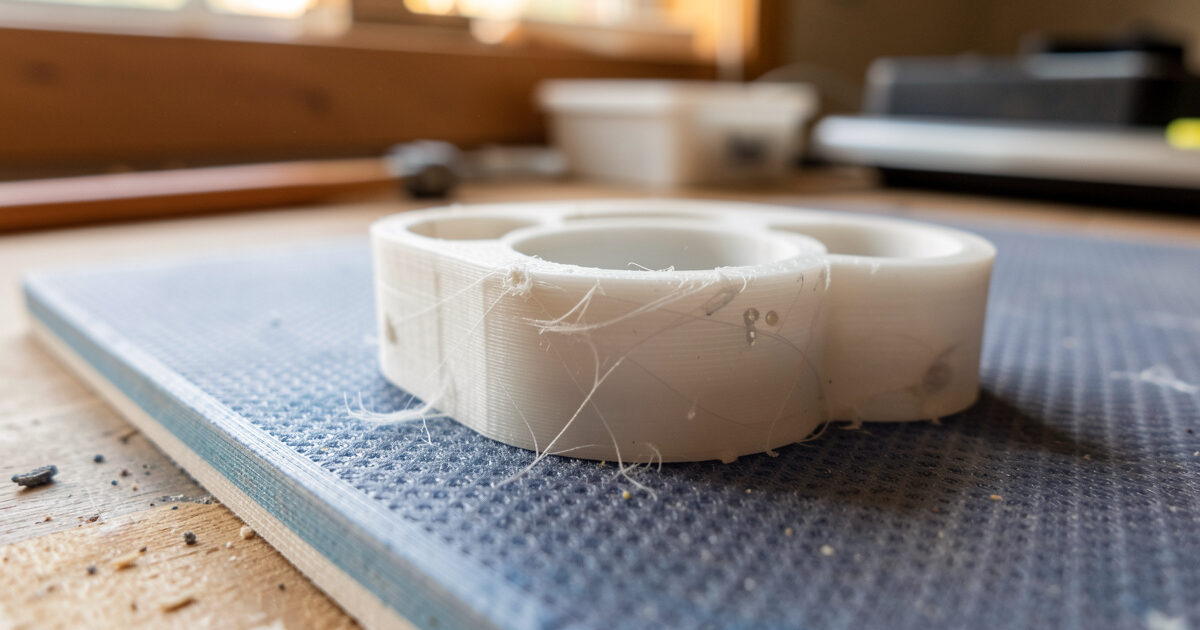
Surface defects are the ones that make a print look amateur even when it is dimensionally fine. The two big ones are stringing and ghosting, and they have nothing to do with each other — people conflate them constantly.
Stringing is molten plastic dribbling out of the nozzle during travel moves, leaving cobwebs. It is a pressure-and-temperature story: too much heat keeps the filament runny, and weak retraction fails to pull it back. PETG strings far worse than PLA because it stays soft over a wider temperature band — the filament I reach for on functional parts is also the one that webs the most. The fix is a tight loop of temperature and retraction tuning, and I walk through the exact sequence in my guide to fixing stringing and oozing (and a material-specific version for the worst offender in the PETG stringing fix).
Ghosting (also called ringing or echoing) is a motion problem. When the toolhead changes direction at a sharp corner, the frame and gantry keep vibrating for a few millimetres, stamping a faint echo of the corner into the wall. You cannot fix it with temperature — it is inertia. The modern answer is input shaping, which most current firmware supports, plus sane acceleration limits. The full diagnostic and tuning path lives in my ghosting and ringing guide. The tell that separates the two: stringing is loose material between features; ghosting is a pattern stamped into a solid surface.
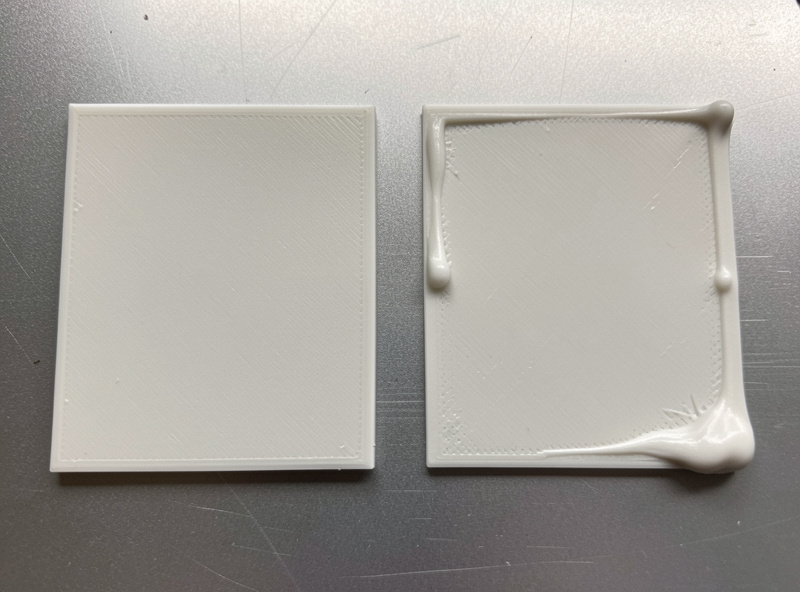
Adhesion and First-Layer Defects: Warping and Elephant Foot
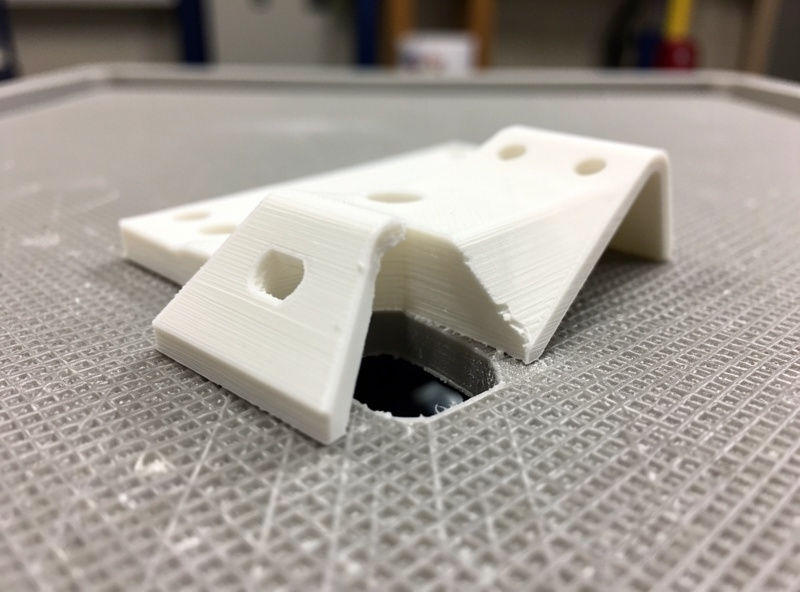
The first layer is where most prints are won or lost, and it produces two opposite-looking defects from related causes. Warping is when a part contracts as it cools and peels its own corners off the bed — you get a banana-shaped base and sometimes a complete detachment mid-print. It is worst on ABS and ASA, real on PETG, and mild but present on big flat PLA parts. The levers are bed cleanliness, bed temperature, a brim or raft, and — the one people skip — controlling the air around the print. My full sequence is in warping and adhesion failures.
Elephant foot is the opposite tell: instead of lifting, the bottom layer or two bulge outward, so the base is wider than the model and dimensions go soft. It happens when the nozzle sits too close to a hot bed and squashes the still-soft first layers under the weight of what is printing above. For functional parts that have to mate with something, elephant foot is the defect I hate most because it quietly ruins tolerances. The fixes — Z-offset, bed temp, and a slicer compensation setting — are in my elephant foot guide. Dialing the first layer properly prevents both, which is why I treat first-layer tuning as the highest-leverage calibration on any machine.
Extrusion Defects: Under-Extrusion and Layer Separation
If the surface looks starved — thin walls, gaps between lines, a top surface you can see through — you are under-extruding. The printer is laying down less plastic than the slicer asked for. Causes stack: a partial nozzle clog, a worn or under-tensioned extruder, wet filament hissing and spitting, a flow rate set too low, or simply printing too fast for the hotend to keep up. The systematic way to corner it is in my under-extrusion troubleshooting guide, and the calibration that underpins it all is E-steps and flow rate.
Layer separation (delamination) is under-extrusion’s structural cousin. The walls might look complete, but they split along a layer line under any stress, because the layers never properly fused. This is almost always too cold, too fast, or wet filament — the new bead never melts into the one below it. On functional parts this is the failure that matters most: a bracket that splits along a layer is scrap. I break down the causes and the fix in layer separation in 3D prints. The diagnostic difference from under-extrusion: under-extrusion shows visible gaps; delamination can look perfect and still snap cleanly along a seam.
Motion Defects: Layer Shifting
Layer shifting is the most alarming defect because the print looks fine for hours and then the entire upper section is offset sideways, as if someone shoved it. It is purely mechanical: the toolhead tried to move to a position it could not reach, the motor skipped steps, and every layer after that is printed from the wrong origin. Loose belts, a binding axis, an obstruction the nozzle clipped, speeds and accelerations beyond what the frame can deliver, or overheating stepper drivers are the usual suspects. None of it is a slicer-temperature issue. The hunt is in my layer shift causes and fixes guide. The tell is unmistakable: a clean horizontal seam where everything above is translated in X, Y, or both.
Calibrate in the Right Order and Most Defects Never Appear
Here is the thing the influencer videos skip: quality problems are mostly prevented, not fixed. A printer that is calibrated in the correct sequence simply does not produce most of the defects above. The order matters because each step depends on the last — tuning retraction before your flow is right just bakes in error.
My standing sequence on any new machine: level and set the first layer, calibrate E-steps and flow, run a temperature tower for each filament, tune retraction, then calibrate pressure advance and input shaping. I lay the whole thing out step by step in the complete calibration guide. Do it once per machine and per filament family, and your defect rate falls off a cliff. Skip it and you will be diagnosing the same five problems forever.
Material Changes Which Defects You Get
One of the biggest mistakes I see is treating every filament like PLA. The defect profile shifts completely with material. PLA is forgiving: it barely warps, adheres easily, and tolerates a cold-fast print. PETG — my default for functional parts — strings aggressively, is fussy about first-layer squish, and delaminates if you run it too cool. ABS and ASA warp violently without an enclosure but reward you with parts that survive a hot car. TPU under-extrudes and tangles if you push speed. Carbon-fiber blends abrade nozzles and need a hardened tip.
So “my printer has a quality problem” is often “I changed materials and kept PLA settings.” Whenever a defect appears right after a filament swap, suspect the material profile first. The same logic applies to the extruder: a direct-drive versus Bowden setup behaves differently on retraction and flexibles, which is why a setting that cured stringing on one machine does nothing on another.
Sometimes the Defect Is the Model, Not the Machine
After years of functional printing I have learned that a stubborn “quality problem” is sometimes a design problem. A part with a tiny contact patch on the bed will warp no matter how clean your sheet is — it needs a brim or a mouse-ear, or a redesign with a fillet. A wall thinner than two nozzle widths will look weak because the slicer cannot fit enough perimeters. A flat bridge with no support will sag because physics, not your printer, is the limit.
Before you tear the machine apart, ask whether the geometry is fighting you. Reorienting a part on the plate, adding a chamfer, or splitting it into two glued halves fixes more “unfixable” prints than any setting. The printer is a tool; the model is half the job. When I hit a wall on a functional part, the fastest path is usually back to CAD, not deeper into the slicer.
A Worked Example: Diagnosing One Failed Bracket
Let me make this concrete with a part I actually print — a PETG mounting bracket for a hydroponic sensor. The first attempt came off the bed with three problems at once, which is exactly when beginners panic and change everything. Instead I ranked them: a lifted corner, faint webbing across a gap, and a base that measured 0.3 mm wider than the model. Three symptoms, three systems.
I worked them in order of impact. The lifted corner is adhesion, and on PETG that meant the bed was a touch cool and the part needed a brim — I cleaned the sheet with isopropyl, bumped the bed, and added a five-line brim. The webbing is stringing, so I dropped the nozzle 5°C and confirmed retraction. The wide base is elephant foot, fixed with a hair more Z-offset and the slicer’s first-layer compensation. One print, three targeted changes, each in a different system so they could not mask each other. The second bracket fit the sensor on the first try. That is the entire method: separate the symptoms, assign each to a system, and fix them where they live.
The Small Diagnostic Kit That Pays for Itself
You cannot fix what you cannot measure. The cheapest upgrade to your print quality is not a part for the printer — it is the few tools that turn “looks off” into a number. A set of digital calipers is non-negotiable: elephant foot, under-extrusion, and dimensional drift are all invisible until you measure a wall and compare it to the model. I keep mine on the bench next to the machines and reach for them on every functional part.
The rest of my diagnostic kit is humble: a feeler gauge or a sheet of standard paper for first-layer feel, a bright raking light to reveal ghosting and layer lines, a cheap digital hygrometer to catch wet filament before it ruins a print, and a sealed dry box with indicating desiccant for the spools that drink water. None of it is glamorous and all of it shortens the diagnosis. If you want a starting point, a basic set of digital calipers is the single tool I would buy first. As an Amazon Associate I earn from qualifying purchases.
Frequently Asked Questions
Why does my 3D print look fine but break easily?
That is layer separation, not a surface defect. The layers never fused, usually because the nozzle ran too cold, the print was too fast, or the filament was wet. Raise the temperature, slow down, and dry the spool to restore strength.
What is the most common cause of 3D print quality problems?
Temperature and extrusion issues account for the majority. A nozzle that is too hot causes stringing and elephant foot; too cold causes layer separation and under-extrusion. Running a temperature tower for each filament resolves a surprising share of complaints.
How do I know if a defect is mechanical or a slicer setting?
Mechanical defects like layer shifting and ghosting come from motion: belts, vibration, skipped steps. They cannot be fixed with temperature. If the defect is a clean sideways offset or an echo stamped into a surface, look at hardware, not the slicer.
Should I change multiple settings at once to fix a print?
No. Change one variable per print and note what it did. If you move three settings and the print improves, you will not know which one helped, and you cannot reproduce the fix on the next filament or machine.
Does the filament material affect which defects I see?
Heavily. PLA barely warps but PETG strings and is fussy about squish, ABS warps without an enclosure, and TPU under-extrudes if pushed fast. A defect that appears right after a filament swap is usually a material-profile problem, not a broken printer.
Can the 3D model itself cause quality problems?
Yes. A tiny bed-contact patch warps regardless of bed prep, walls thinner than two nozzle widths print weak, and unsupported bridges sag. Reorienting the part, adding a brim or fillet, or splitting the model often fixes prints no setting can.
Related Guides: Every Quality Defect, One at a Time
This hub is the map; each guide below is the focused fix for one defect:
- Fixing Stringing and Oozing
- Warping and Adhesion Failures
- Layer Shifting Causes and Fixes
- Under-Extrusion Troubleshooting
- Elephant Foot First-Layer Problem
- Ghosting and Ringing in 3D Prints
- Layer Separation in 3D Prints